Cardigan knitting
Added: 14.08.2025 в 20:36 Views: 398
Cardigan knittingKlubokhttp://klubok.work/1/2/9024/Klubokhttps://klubok.work/css/image/top-logo-en.png
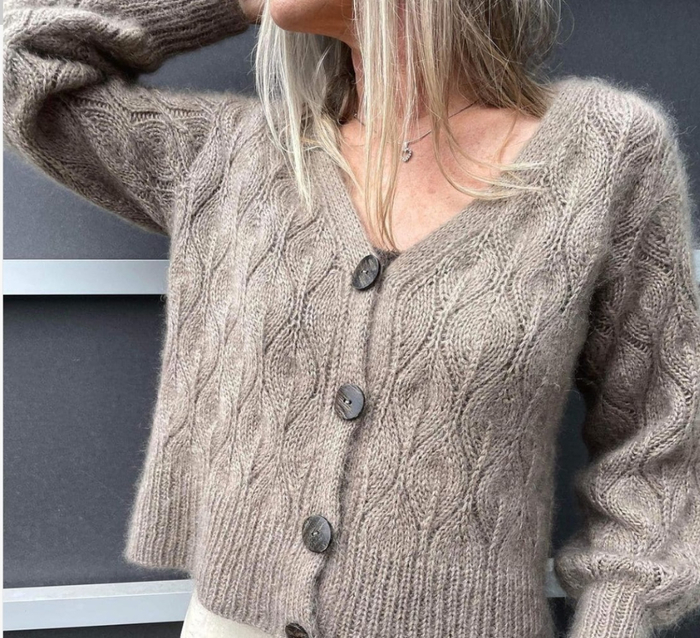
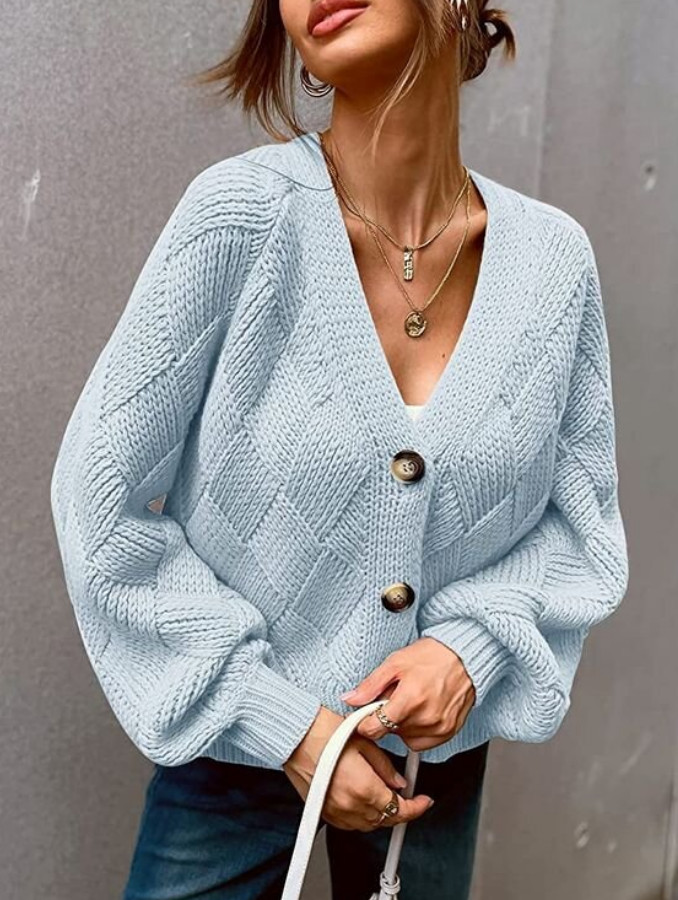
An oversized cardigan with a deep neckline knitted with a textured pattern.
A simple yet striking textured pattern, comfortable ease, dense stabilizing button band – this is a new convenient oversized cardigan and it is incredibly attractive. By choosing the optimal length and style of buttons, you can create the desired style of cardigan. For the cool weather season, you will be fully prepared!
The cardigan is knitted top down without seams.
Increases are made to form a V-neck, and the cardigan is knitted in rows. Stitches for the sleeves are picked up around the armholes, and the sleeves are knitted straight until it's time to decrease for a more fitted cuff. Finally, stitches are picked up along the edge to knit a double band, where the buttonholes are formed as you knit.
Sizes: 1 (2) 3 (4) 5 (6) 7 (8) 9
Final bust measurements: 95 (105) 115 (125) 135 (145) 155 (165) 175 cm.
Length: 55 (56) 56 (56) 56 (60) 60 (60) 60 cm.
A 15-20 cm ease is recommended.
1 inch (") = 2.5 cm.
Materials:
Yarn:
Jord Clothing Woolly Light (100% merino; 250 meters in 50 g) in 1 strand - 250 (250) 250 (250-300) 250-300 (350) 350 (350) 450 g,
combined with
Dale Garn Silk Mohair ( 210 meters in 25 g) in 2 strands - 275 (275) 325 (325) 350 (400) 400 (425) 450 g.
Knit in 3 strands.
Needles: circular 3.5 mm and 4.5 mm, 40 cm, 80-100 cm long.
Stitch markers, stitch holders, knitting needle, 5 buttons with a diameter of 15-17 mm.
Gauge: 18 sts and 29 rows in a 10 cm square of the pattern, measured after blocking.
Abbreviations and Techniques:
RS/ WS - right side/ wrong side
PM/ M - marker / round marker
SM/ PM – slip/ move marker
k2tog/ p2tog – knit or purl 2 stitches together
kfb/ pfb – knit or purl into the front and back of one stitch
+1St/ +1St - right-leaning increase: insert left needle from back to front under the yarn between stitches and knit/ purl it through the front loop.
+1L/ +1L - left-leaning increase: insert left needle from front to back under the yarn between stitches and knit/ purl it through the back loop.
Instructions
Back
For better fitting, cast on stitches for both shoulders separately, making a small neckline. If you have paused your knitting for a while and are unsure of which row to knit now, look at your work and compare it to the chart A.
Right Shoulder.
Needles 4.5 mm [US 7]; cast on 23 (25) 31 (35) 39 (43)47 (51) 55 sts.
Start with Row 4 of the chart (below). The first row is on WS.
Increase 1 st after the first 2 sts of the row – every 2nd row, = RS:
Row 4 (WS): knit
Row 5 (RS): 2knit, +1L, knit

Row 6: knit
Row 7: 1knit, 1purl, +1L, purl to 1 st at the end, 1knit
Row 8: 1knit, purl to 1 st at the end, 1knit
On the needle 25 (27) 33 (37) 41 (45) 49 (53) 57 sts.
Cut the yarn.
How to cast on stitches for the left shoulder on the same needle:
Make sure the stitches for the right shoulder remain on the outermost part of the needle (do not shift them to the cable yet).
Cast on stitches for the left shoulder at the opposite end of the needle and follow the instructions for the left shoulder of the back.
Now you can secure the stitches for the right back and transfer them to the cable if you wish.
This way, you will be able to knit until you join the back.
Left Shoulder
Needles 4.5 mm [US 7]; cast on 23 (25) 31 (35) 39 (43)47 (51) 55 sts.
Start with Row 4 of the chart. The first row is on WS.
Increase 1 st before the last 2 sts at the end – every 2nd row:
Row 4 (WS): knit
Row 5 (RS): knit to 2 sts at the end, +1St, 2knit
Row 6: knit
Row 7: 1knit, purl to 2 sts at the end, +1St, 1purl, 1knit
Row 8: 1knit, purl to 1 st at the end, 1knit
On the needle 25 (27) 33 (37) 41 (45) 49 (53) 57 sts.
Do not cut the yarn!
Joining the Back
Cast on new stitches using the backwards loop method:
(RS) knit according to the left shoulder stitches, Row 9 of Chart A, to 1 st at the end, 1purl, cast on 35 (37) 37 (37) 39 (39) 41 (41) 41 sts, continue according to the right shoulder stitches: 1purl, continue with the 2nd st of Row 9 of Chart A to 2 sts at the end, knit2tog, 1knit.
On the needle 85 (91) 103 (111) 121 (129) 139 (147) 155 sts.
Continue according to Chart A until you complete a total of 3 (3) 3 (3) 4 (4) 4 (4) 4 repeats of the pattern (from the cast on edge of the shoulder, and even if you did not start with row 1 at the beginning, it is still considered one full repeat of the pattern).
Knit 4 (10) 10 (16) 2 (2) 8 (12) 12 more rows.
The last row is on WS.
Cut the yarn, set the stitches aside.
Front
The fronts are knitted separately to form the neckline, and then knit together to form the armholes.
Right Front
With RS; pick up 23 (25) 31 (35) 39 (43)47 (51) 55 sts along the shoulder. Start from the shoulder edge and work towards the neckline.
Follow Chart C – 1 (Chart C – 2) Chart C – 3 (Chart C – 4) Chart C – 5 (Chart C – 6) Chart C – 7 (Chart C – 8) Chart C – 9.
The first row of the chart indicates the stitches you just picked up.
Charts are read right to left on RS, and left to right on WS.
Knit the chart completely.
Cut the yarn, set the stitches aside.
Left Front
With RS; pick up 23 (25) 31 (35) 39 (43)47 (51) 55 sts., starting from the neckline.
Follow Chart D – 1 (Chart D – 2) Chart D – 3 (Chart D – 4) Chart D – 5 (Chart D – 6) Chart D – 7 (Chart D – 8) Chart D – 9.
The first row – was the picked up stitches.
Once you finish the chart, do not cut the yarn!
Body
Continue knitting according to Chart A after the row where you stopped knitting the pieces.
Knit all sts according to row 5 (11) 11 (17) 3 (3) 7 (13) 13 of Chart A.
Knit all sts of the left front – cast on 3 (3) 3 (3) 3 (3) 3 (3) sts – knit all sts of the back – cast on 3 (3) 3 (3) 3 (3) 3 (3) 3 (3) sts – knit all sts of the right front.
On the needle 165 (179) 203 (219) 237 (253) 275 (291) 307 sts.
Knit according to Chart A until you complete a total of 7 (7) 7 (7) 7 (8) 8 (8) 8 repeats of the pattern from the cast on row of the shoulder.
Knit 6 (8) 8 (8) 8 (2) 2 (2) 2 more rows.
Knit 1 row with all knit stitches (for all sizes). Tip! Knit this last row with 3.5 mm [US 4] needles for a neater transition to the ribbing (optional).
Ribbing
Needles 3.5 mm [US 4] and knit ribbing (k2, p2).
As the ribbing is set on WS, knit the first row of the ribbing as follows: 1 knit st – *p2, k2* repeat until 2 sts remain – p2, 1 knit.
Knit ribbing (k2, p2) a total of 5 cm (for all sizes). Finish on WS.
Preparing to bind off. (WARNING! Pay attention to how the purl stitches are knitted in the 2nd row):
Row 1: 2tog knit through the back loops, slip next st as purl with yarn in front – *k2, slip next st as purl with yarn in front, repeat to the end of the row* repeat to the end
Row 2: *k2, slip next st as purl with yarn in front* repeat to 1 st at the end, purl.
Bind off stitches using the Italian method (with needle)
Sleeves
With the larger needle, starting at the bottom of the armhole, pick up 70 (74) 76 (82) 86 (94) 102 (110) 116 sts. (1 st from every 2 sts), PM and begin Row 2 of Chart B.
Knit in the round according to Chart B until you have completed a total of 6 (6) 6 (6) 6 (6) 5 (5) 5 repeats or to the desired length. Knit 8 (6) 4 (2) 2 (2) 4 (2) 2 more rounds according to Chart B. Decreases for ribbing
Evenly decrease 28 (30) 30 (34) 36 (42) 46 (52) 56 sts, knitting all stitches knitwise.
It is recommended to do it as *k2tog, k2tog, 1knit* to the end.
On the needle 42 (44) 46 (48) 50 (52) 56 (58) 60 sts.
Ribbing
Needles 3.5 mm [US 4] and knit ribbing (k2, p2) a total of 5 cm (for all sizes).
Preparing to bind off:
Round 1: *p2, slip 1 st as purl with yarn in front* repeat to the end.
Round 2: *slip 1 st as purl with yarn in front, purl* repeat to the end
Bind off stitches using the Italian method (with needle).
Bands
The band will be completely knitted in hollow knitting. Pick up stitches with 4.5 mm [US 7] needles along the entire edge of the cardigan, cast on stitches for the hollow band, and work stitches for the buttonholes. If you know you knit a bit loosely, it is recommended to knit the band with 4 mm needles.
With the 4.5 mm [7 US] needle (80+ cm); pick up 351 (357) 357 (357) 359 (387) 389 (389) 389 sts from every 2 rows of ribbing and from each row along the edge of the fronts and neckline.
Cut the yarn.
Mark the points for the buttonholes.
To achieve an even distribution of 5 buttons and correct placement of the buttonholes, place a removable marker at the spot of the last increase on the right front and a marker before the last 5-6 sts on the left front.
Now the stitches should be picked up on the outermost edge of the needle that is on the right front.
Cast on 12 stitches on the 4.5 mm needle (the end of the needle you started with for the button band), using the Italian method of casting on
Knit in hollow knitting:
Row 1: *slip 1 st as purl with yarn in front, 1knit* repeat 5 times, slip 1 st as purl with yarn in front, knit2tog through the back loops, turn
Row 2: *slip 1 st as purl with yarn in front, 1knit* repeat to the end
Repeat the above rows until you knit the last 2 stitches before the marker and finish Row 2.
Make a buttonhole without cutting the yarn.
Row 1: *slip 1 st as purl with yarn in front, 1knit* repeat 3 times, turn
Row 2: *slip 1 st as purl with yarn in front, 1knit* repeat 3 times, turn
Knit these 2 rows a total of 2 times.
Then:
Row 1: Knit in hollow knitting on the first 6 sts on the needle, yarn over, knit in hollow knitting on the next 5 sts, knit2tog through the back loops, turn.
Row 2: Knit in hollow knitting to 1 st before the yarn over, slip the stitch as knit, slip the yarn over as knit, insert the left needle into these 2 sts (currently on the right needle) and knit2tog through the back loops, insert the left needle into the space, making a new yarn over, turn.
Row 3: Knit in hollow knitting on the next 5 sts, knit2tog through the back loops, turn.
Row 4: Knit in hollow knitting to 1 st before the yarn over, slip the stitch as knit, slip the yarn over as knit, insert the left needle into these 2 sts and knit2tog through the back loops, insert the left needle into the space, making a new yarn over, turn
Row 5: Knit in hollow knitting on the next 5 sts, knit2tog through the back loops, turn.
Row 6: Knit in hollow knitting to 1 st before the yarn over, slip the stitch as knit, slip the yarn over as knit, insert the left needle into these 2 sts (currently on the right needle) and knit2tog through the back loops, insert the left needle into the space, making a new yarn over, turn
You have completed the first buttonhole.
Continue to knit in hollow knitting until you knit the last 2 stitches before the marker and finish the 2nd row of hollow knitting.
Make the second buttonhole as described above and so on (the number of buttons and buttonholes may be individual).
Knit in hollow knitting until 12 sts remain.
Bind off stitches using the Italian method.
Wet according to the yarn label, block to measurements, weave in the yarn tails.
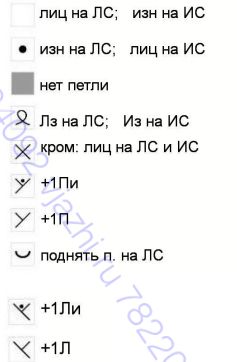
![]() knit
knit
![]()
twisted stitch (ktbl)
![]() no stitch
no stitch
![]() + 1 knit
+ 1 knit
![]()
+ 1 knit
X- selvedge- knit on RS and WS