Knitting a cardigan
Added: 18.09.2025 в 13:57 Views: 1719
Knitting a cardiganKlubokhttp://klubok.work/1/2/9116/Klubokhttps://klubok.work/css/image/top-logo-en.png
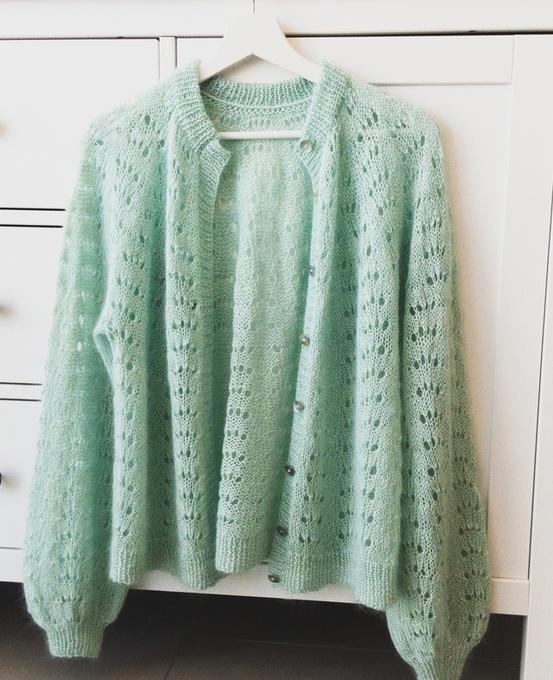


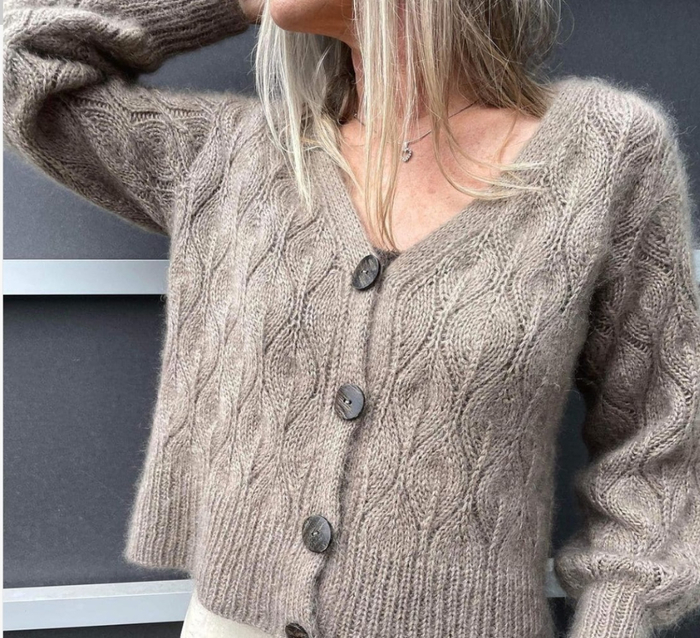
The Camelia cardigan is knitted with a beautiful yet simple lace pattern, seamless, from the bottom up. Why from the bottom up? – you may ask. The pattern of the lace is best showcased in this direction.
The description provides instructions for a wide range of sizes – sizes from 76 cm to 168 cm (circumference at the bust).
Sizes: 1 (2, 3, 4, 5) {6, 7, 8, 9, 10}.
For bust circumference: 76 (86.5, 96.5, 106.5, 117) {127, 137, 147.5, 157.5, 167.5} cm.
Ease allowance: 11.5-17 cm.
The cardigan in the photo is shown in Size 1, with an ease allowance of 14 cm.
Bust circumference of the cardigan (when fastened): 93 (98.5, 111.5, 120, 128.5) {141.5, 149.5, 160.5, 171, 182.5} cm.
Materials.
Yarn: The cardigan is fully knitted from lace weight mohair yarn, STRANDED DOUBLE. We are Knitters, Touch Me Mohair (54% baby alpaca, 22% super kid mohair, 24% mulberry silk; 400 m in 50 g), in the shade Natural, 4 (4, 5, 5, 6) {6, 6, 7, 7, 8} skeins.
Or other lace weight yarn, stranded double.
Approximate yarn consumption for lace weight yarn knitted double: 1435 (1555, 1785, 1905, 2010) {2240, 2380, 2535, 2720, 2915} m.
If you knit with a single strand of thicker yarn, you will need about half the amount recommended above.
Buttons
You will need buttons with a diameter of approximately 23 mm, 6 pieces (you can use a different number of buttons, depending on the chosen length of the cardigan and your preferences).
Needles.
Circular needles 5 mm with a cable length of 80-100 cm (for the main pieces).
Circular needles 4 mm with a cable length of 80-100 cm (for the ribbing at the bottom of the body, cuffs, and bands)
For knitting the sleeves and cuffs, choose the type of needles based on your preferences: circular needles with a short cable, a set of double-pointed needles, or circular needles with a long cable using the Magic Loop method.
Other tools: removable markers, markers, waste yarn, tapestry needle.
Knitting gauge: 17.5 st x 22.5 rows/rounds = 10 cm x 10 cm in lace pattern, in circular and flat rows, using 5 mm needles, after blocking the sample.
The gauge in height (based on the number of rows in 10 cm) is not critical for this project but can affect yarn consumption.
Required skills and abilities: decreasing and increasing stitches, knitting lace pattern in flat and circular rows, picking up stitches.
Abbreviations:
RS / WS = right side / wrong side
st. = stitch
knit / purl = knit st. / purl st.
sl. = slip stitch as purl from left needle to right (yarn in back)
2 tog. knit = knit 2 st. together as knit (1 st. decreased)
2 tog. purl = knit 2 st. together as purl (1 st. decreased)
sk2p = slip 1 st. as knit, slip another 1 st. as knit, return both stitches to left needle, reoriented, and knit them together as knit through the back loop. (1 st. decreased)
k1tbl = knit the stitch through the front leg and then through the back leg of the same stitch (1 st. increased)
kfb = lifted increase leaning to the right: with the tip of the right needle lift the right leg of the stitch that is one row below the next stitch on the left needle and knit it.
k1 / k1f = increase 1 st. leaning to the right knit / purl: with the tip of the right needle lift the yarn between the last knitted stitch and the next, inserting the needle from the front, place it on the left needle, knit through the front leg / purl through the front leg.
marker / round marker = marker / beginning of round
pm = place marker
sm = slip marker from left needle to right
Round = round
Special techniques and methods.
Classic cast on method with a long tail.
Closing stitches using the 3-needle bind off method (used to join the underarms).
Transfer the underarm stitches of the sleeve to one double-pointed needle or a spare circular needle of appropriate size, and the underarm stitches of the body to another double-pointed needle (or spare circular).
Step 1: fold the two pieces right sides together, holding the needles parallel to each other (the tips of the needles oriented to the right). Insert the third needle (5 mm needles) into the first stitch on each of the two needles from left to right and knit them together with the working yarn.
Step 2: knit the next two stitches from both needles as in Step 1.
Step 3: lift the first stitch from the right needle over the just knitted one.
Repeat Steps 2 and 3 until there is 1 st. left on the right needle. Pull the end of the yarn through the remaining stitch to secure it.
Knitting lace pattern (performed on a multiple of 11 stitches).
In flat rows:
Row 1 (RS, row with decreases and yarn overs): *sk2p, sk2p, [yarn over, 1 knit] x 3 times, yarn over, 2 tog. knit, 2 tog. knit**; repeat from * to **.
Note: If the number of stitches in the row does not allow you to complete the repeat fully, finish it as you can, but adjust the number of stitches (that is, check in the last repeat – whether the number of decreased stitches matches the number of yarn overs).
Row 2 (WS): purl st. to the end of the row.
Row 3 (RS): knit st. to the end of the row.
Rows 4-5: repeat Rows 2-3.
Row 6 (WS): purl st. to the end of the row.
Repeat Rows 1-6.
In circular rows:
Round 1 (row with decreases and yarn overs): *sk2p, sk2p, [yarn over, 1 knit] x 3 times, yarn over, 2 tog. knit, 2 tog. knit**; repeat from * to ** until the end of the round.
Rounds 2-6: knit st. to the end of the round.
Repeat Rounds 1-6.
Diagram of the lace pattern:
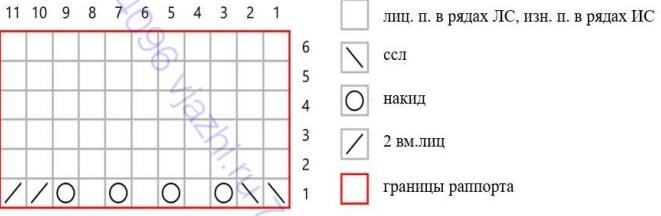
1. ![]() knit
knit
2. ![]()
sk2p
3.![]() yarn over
yarn over
4.![]() 2 tog. knit
2 tog. knit
5. boundaries of the repeat
WORK DESCRIPTION.
Notes:
❖ Before starting work, circle or mark the numbers that correspond to your size in the entire instruction. This will greatly simplify the perception of information and help you avoid mistakes.
❖ The cardigan is fully knitted with two strands.
❖ The description includes links to videos on performing the main techniques and methods.
❖ The cardigan is knitted from the bottom up.
Sleeves (both sleeves are knitted the same).
Sleeve Cuff.
Using 4 mm needles, cast on 30 (32, 34, 36, 38) {38, 40, 42, 46, 48} st. using the classic long tail cast on method.
Join the stitches in a round. pm.
Round 1: [1 knit, 1 purl] – repeat to the end of the round.
Repeat Round 1 for a height of 5 cm.
Main part of the sleeve.
Change to 5 mm needles.
Round 1 / increases:
❖ 0 (1, 0, 0, 0) {0, 0, 0, 2, 0} knit,
❖ *[k1f, 1 knit] x 14 (14, 3, 3, 3) {1, 1, 1, 1, 1} times, k1f, 2 tog. knit**, perform from * to ** a total of 2 (2, 7, 8, 8) {14, 18, 18, 17, 19} times.
❖ [k1f, 1 knit] x 0 (1, 6, 4, 6) {10, 4, 6, 10, 10} times.
= 62 (65, 75, 80, 84) {90, 98, 102, 107, 115} st.
Tip: In the next round, the lace pattern will start. For convenience, you can place additional markers to indicate the boundaries of the lace repeats.
Round 2 (beginning of lace pattern, round with decreases and yarn overs): 4 (5, 5, 2, 4) {1, 5, 2, 4, 3} knit, pm, knit in lace pattern (starting from Round 1 of the pattern) to the last 3 (5, 4, 1, 3) {1, 5, 1, 4, 2} st., pm, 3 (5, 4, 1, 3) {1, 5, 1, 4, 2} knit. Knit the sleeve as established, knitting the stitches before and after the marker (the underlined stitches) in stockinette stitch, and the stitches between the markers in lace pattern in circular rows.
Continue in this way for another 72 rounds. Or knit until the sleeve length reaches 38 cm from the lower edge. The final round should be Round 1.
Next Round: knit st. to 3 (3, 4, 6, 7) {7, 10, 11, 12, 14} st. before the marker, place the next 5 (5, 7, 12, 14) {14, 19, 22, 24, 28} st. on waste yarn or stitch holder (= underarm stitches).
57 (60, 68, 68, 70) {76, 79, 80, 83, 87} st. of the sleeve remain.
Cut the yarn, leaving a tail about 6 times longer than the width of the underarm.
Set aside the sleeve stitches (you can transfer them to spare needles or to a cable).
Knit the second sleeve similarly.
Body of the cardigan.
Ribbing at the bottom of the body.
Cast on 157 (167, 189, 205, 219) {243, 257, 275, 293, 313} st. using 4 mm needles and the classic long tail cast on method.
Row 1 (WS): 1 purl, [1 knit, 1 purl] – to the end of the row.
Row 2 (RS): 1 knit, [1 purl, 1 knit] – to the end of the row.
Repeat Rows 1-2 for a height of 5 cm. Finish with a WS row.
Lower part of the body.
Change to 5 mm needles.
Row 1 (RS): follow the instructions for your size.
❖ Sizes 1 (-, 3, -, 5) {-, -, 8, 9, 10}: knit st. approximately to the middle of the row, kfb, knit st. to the end of the row.
❖ Sizes - (2, -, 4, -) {6, 7, -, -, -}: knit st. to the end of the row.
= 158 (167, 190, 205, 220) {243, 257, 276, 294, 314} st.
Row 2 (WS): purl st. to the end of the row.
Row 3 (RS): knit st. to the end of the row.
Row 4 (WS): purl st. to the end of the row.
Tip: In the next row, the lace pattern will start. For convenience, you can place additional markers to indicate the boundaries of the pattern repeats.
Row 5 (RS, row with decreases and yarn overs): 2 (1, 1, 1, 2) knit, pm, knit in lace pattern to the last 2 (1, 2, 1, 4) {4, 2, 4, 2, 4} st., pm, 2 (1, 2, 1, 4) {4, 2, 4, 2, 4} knit.
Note: For Sizes - (-, -, 4, 5) {6, -, 8, 9, -} the final repeat of the row is incomplete and will end with the 5th stitch of the pattern. Be careful to check that the number of decreased stitches and yarn overs in the last repeat matches.
Knit as established (knitting the underlined stitches at the beginning and end of the row in stockinette stitch, the rest of the stitches in lace pattern). Continue in this way for another 42 rows. The length of the body will be approximately 26.5 cm from the lower edge.
Tip: You can adjust the length of the body before the armholes. In this case, knit more or fewer rows. You should finish with Row 1 of the lace pattern (the row where decreases and yarn overs are made).
Knit one row of purl stitches (= WS row).
Do not cut the yarn. You will continue working with this same yarn.
Joining the body and sleeves.
In the next row, you will need to join the body and sleeves to knit the upper part of the cardigan as one piece.
Row 1 (RS): Starting from the right front, knit the body stitches:
❖ 36 (38, 42, 43, 46) {53, 53, 57, 60, 63} knit across the stitches of the right front, place the next 5 (5, 7, 12, 14) {14, 19, 22, 24, 28} st. on waste yarn (= underarm stitches),
❖ Knit 57 (60, 68, 68, 70) {76, 79, 80, 83, 87} knit across the stitches of the sleeve.
❖ Knit 76 (81, 92, 95, 100) {109, 113, 118, 126, 132} knit across the stitches of the back.
❖ Place the next 5 (5, 7, 12, 14) {14, 19, 22, 24, 28} st. on waste yarn (= underarm stitches), then knit 57 (60, 68, 68, 70) {76, 79, 80, 83, 87} knit across the stitches of the second sleeve.
❖ Knit 36 (38, 42, 43, 46) {53, 53, 57, 60, 63} knit across the stitches of the left front.
There are a total of 262 (277, 312, 317, 332) {367, 377, 392, 412, 432} st. on the needles for the upper part of the cardigan.
You have joined the body and sleeves. The underarm stitches of the sleeves and body are on waste yarn (or stitch holders).
Yoke.
First section of decreases.
Row 1 (WS): purl st. to the end of the row.
Row 2 (RS): knit st. to the end of the row.
Row 3 (WS): purl st. to the end of the row.
Note: In the next row, you will be performing a lace pattern row with decreases and yarn overs.
For convenience, you can place additional markers to indicate the boundaries of the lace repeats.
Row 4 (RS, row with decreases and yarn overs): 1 knit, pm, knit in lace pattern (Row 1 of the lace pattern) to the last 3 (1, 3, 3, 1) {3, 2, 1, 4, 2} st., pm, knit to the end of the row.
Note for Sizes 1 (-, -, 4, -) {-, -, 8, -, -}: the final repeat of the row is incomplete and will end with the 5th stitch of the pattern. Be careful to check that the number of decreased stitches and yarn overs in the last repeat matches.
Note for all sizes: Note that the lace pattern will shift in the upper part of the cardigan (the columns of repeats will not align with the columns of the lower part of the cardigan and sleeves). The lace pattern will shift each time a row with decreases and yarn overs is performed.
Continue to knit as established, knitting the underlined stitches before and after the markers in stockinette stitch, and the remaining stitches in lace pattern. Knit in this way to a height of 6.5 (7.5, 8, 9, 8) {9, 9.5, 10.5, 11.5, 11.5} cm from the underarms. Finish with a RS row.
Next Row (WS) / first decrease row for shaping the yoke:
When you perform this row, remove all markers. knit 2 purl, [2 tog. purl, 3 purl] – to the end of the row.
= 210 (222, 250, 254, 266) {294, 302, 314, 330, 346} st.
Second section of decreases.
Place a marker after the first 3 (1, 1, 3, 1) {1, 2, 2, 2, 2} st. of the row and before the last 4 (1, 2, 4, 1) {2, 3, 4, 4, 3} st. of the row.
Continue to knit, knitting the underlined stitches in stockinette stitch, and the remaining stitches in lace pattern.
Note: For Sizes 1 (-, 3, 4, -) {6, -, -, 9, -} the final repeat of the row is incomplete and will end with the 5th stitch of the pattern. Be careful to check that the number of decreased stitches and yarn overs in the last repeat matches.
Knit in this way until the piece reaches a height of 12.5 (14, 15, 16, 15.5) {17, 17.5, 18.5, 19.5, 20.5} cm from the underarms. Finish with a WS row.
Next Row (WS) / second decrease row for shaping the yoke.
When performing this row, remove all markers.
Knit 2 purl, [2 tog. purl, 2 purl] – to the end of the row.
= 158 (167, 188, 191, 200) {221, 227, 236, 248, 260} st.
Third section of decreases.
Place a marker after the first 1 (1, 3, 1, 1) {3, 3, 2, 2, 3} st. of the row and before the last 3 (1, 4, 3, 1) {4, 4, 3, 4, 4} st. of the row.
Continue to knit, knitting the underlined stitches in stockinette stitch, and the remaining stitches in lace pattern.
Note: For Sizes - (-, 3, -, -) {6, -, -, -, -} the final repeat of the row is incomplete and will end with the 5th stitch of the pattern. Be careful to check that the number of decreased stitches and yarn overs in the last repeat matches.
Knit in this way until the piece reaches a height of 17.5 (19, 20, 21, 21.5) {23, 23.5, 24.5, 25.5, 26.5} cm from the underarms. Finish with a WS row.
Next Row (WS) / third decrease row for shaping the yoke.
When performing this row, remove all markers.
Knit 2 purl, [2 tog. purl, 1 purl] – to the end of the row.
= 106 (112, 126, 128, 134) {148, 152, 158, 166, 174} st.
Fourth section of decreases.
Place a marker after the first 3 (1, 2, 3, 1) {2, 1, 1, 3, 1} st. of the row and before the last 4 (1, 3, 4, 1) {3, 3, 3, 4, 3} st. of the row.
Continue to knit, knitting the underlined stitches in stockinette stitch, and the remaining stitches in lace pattern.
Note: For Sizes - (-, -, -, -) {-, 7, -, 9, 10} the final repeat of the row is incomplete and will end with the 5th stitch of the pattern. Be careful to check that the number of decreased stitches and yarn overs in the last repeat matches.
Knit in this way until the piece reaches a height of 21.5 (23, 24, 25, 25.5) {27, 27.5, 28.5, 29.5, 30.5} cm from the underarms. Finish with a WS row.
Next Row (WS) / fourth decrease row for shaping the yoke.
When performing this row, remove all markers.
❖ 0 (1, 1, 1, 1) {1, 1, 1, 1, 1} purl,
❖ [1 purl, 2 tog. purl] x 6 (8, 7, 8, 9) {8, 10, 9, 11, 9} times,
❖ [2 tog. purl] x 36 (31, 41, 39, 39) {49, 45, 51, 49, 59} times,
❖ [1 purl, 2 tog. purl] x 5 (8, 7, 8, 9) {8, 10, 9, 11, 9} times,
❖ 1 purl.
= 59 (65, 71, 73, 77) {83, 87, 89, 95, 97} st.
Neckband.
Change to 4 mm needles.
Row 1 (RS): 1 knit, [1 purl, 1 knit] – to the end of the row.
Row 2 (WS): 1 purl, [1 knit, 1 purl] – to the end of the row.
Repeat Rows 1-2 for a height of 9 cm for the band.
Finish with a WS row.
Closing stitches of the band.
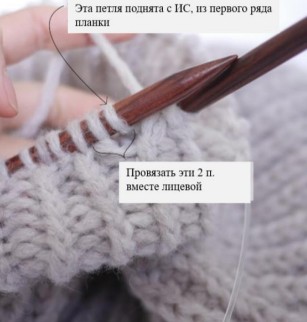
Using 5 mm needles (if you want to make the neckline slightly narrower than that of the cardigan in the title photo, you can use 4 mm needles) do the following:
❖ Step 1: Fold the band in half, with the wrong side facing in.
❖ Step 2: Lift 1 st. from the first row of the band from the WS, place it on the left needle (make sure the lifted stitch is from the same column as the stitch on the left needle), knit both stitches (the lifted one and the one from the left needle) together as knit (see photo).
❖ Step 3: Repeat Step 2.
❖ Step 4: Lift the second stitch on the right needle over the first (= 1 st. closed).
❖ Repeat Steps 3-4 until all stitches are closed.
Cut the yarn.
Left front band.
From the RS, using 4 mm needles, starting from the upper corner of the left front, lift and knit 8 st. from the neckband (make sure to lift the stitches, capturing both "layers" of the folded band), then lift and knit 3 st. from every 4 st. along the left front.
The total number of band stitches should be odd.
Note how many stitches you lifted in total ____.
Row 1 (WS): 1 purl, [1 knit, 1 purl] – to the end of the row.
Row 2 (RS): 1 knit, [1 purl, 1 knit] – to the end of the row.
Repeat Rows 1-2 two more times.
Next Row: knit like Row 1.
Close all stitches according to the pattern (knit stitches as knit, purl stitches as purl). Cut the yarn.
Right front band.
From the RS, using 4 mm needles, starting from the lower corner of the right front, lift and knit 3 st. from every 4 st. along the right front from the bottom to the beginning of the neckband, then lift and knit 8 st. from the folded neckband (capturing both "layers" of the band).
Row 1 (WS): 1 purl, [1 knit, 1 purl] – to the end of the row.
Row 2 (RS): 1 knit, [1 purl, 1 knit] – to the end of the row.
Row 3 (WS): knit like Row 1.
Lay the cardigan on a flat surface. Arrange the buttons (at equal distances from each other) in the places where you will make the buttonholes.
Place removable markers directly on the needle cable in the places where the buttonholes will be (place the marker in line with the center of the button).
Row 4 (RS) / creating buttonholes:
❖ *Knit according to the rib pattern to the removable marker, remove the marker.
❖ Make 2 tog. purl (if the next stitch is purl) or 2 tog. knit (if the next stitch is knit). You can place a removable marker on the resulting stitch, so it will be easier to remember where to make increases in the next row at the buttonhole position**
❖ Repeat from * to ** until all buttonholes are made.
❖ Knit according to the rib pattern to the end of the row.
Row 5 (WS):
❖ *Knit according to the pattern to the decrease from the previous row (if you placed a removable marker on the decrease, then to the removable marker, remove the marker),
❖ Make the kfb or k1f, depending on what stitch should be according to the rib pattern **
❖ Repeat from * to ** until all buttonholes are processed.
❖ Knit according to the rib pattern to the end of the row.
Then knit 3 more rows according to the rib pattern.
Close the stitches of the band according to the pattern (knit stitches as knit, purl stitches as purl).
Cut the yarn.
Joining the underarms.
Transfer the body underarm stitches to a double-pointed needle, and the sleeve underarm stitches to another needle.
Join the underarms using the 3-needle bind off method: Fold the underarms WS together, using the WS of the third 5 mm needle and the remaining yarn from the sleeves to join the stitches while closing them.
(See in the section Special techniques and methods – how to join stitches using the 3-needle bind off method).
Note: When knitting the cardigan from the photo, one additional stitch was lifted in the corners of the underarms before closing the stitches to avoid holes in those places. If desired, you can simply carefully sew up these holes if necessary.
Finishing work.
Weave in all ends. Block the cardigan to the final measurements (see page 11).
Sew buttons to the left band, placing them directly opposite the center of the buttonholes. Final measurements of the cardigan.

When blocking, try not to stretch the ribbing at the bottom and the cuffs of the sleeves.
The design of the model assumes that the depth of the neckline for both the front and back is the same. However, you can shape a slightly deeper front neckline when blocking the cardigan.
When blocking, leave the upper part of the cardigan unbuttoned and slightly spread the upper corners outward (as shown in the pattern – see before the table).