Mohair cardigan knitting needles
Added: 18.09.2025 в 15:49 Views: 1977
Mohair cardigan knitting needlesKlubokhttp://klubok.work/1/2/9118/Klubokhttps://klubok.work/css/image/top-logo-en.png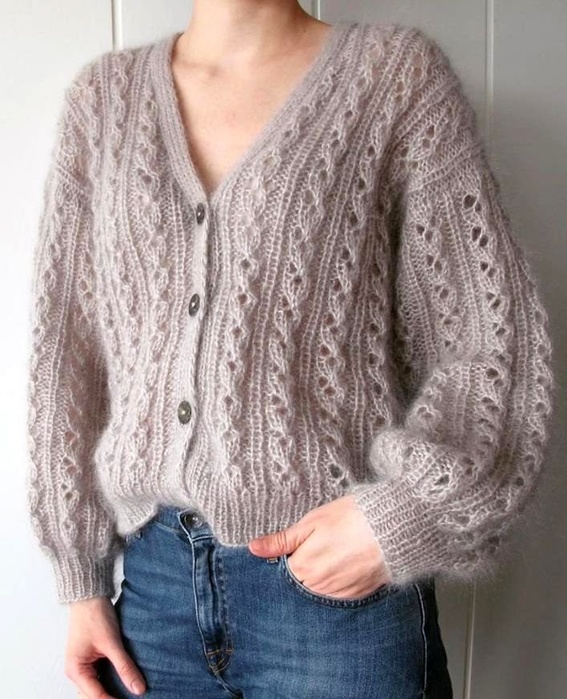
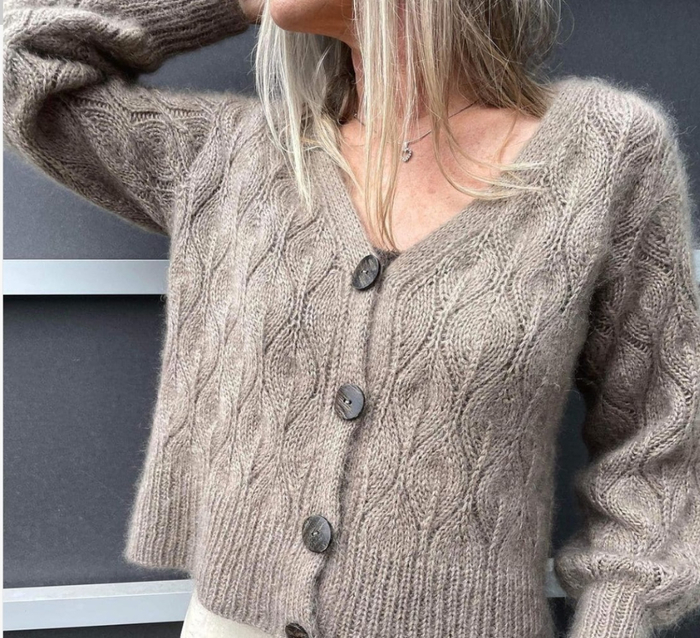
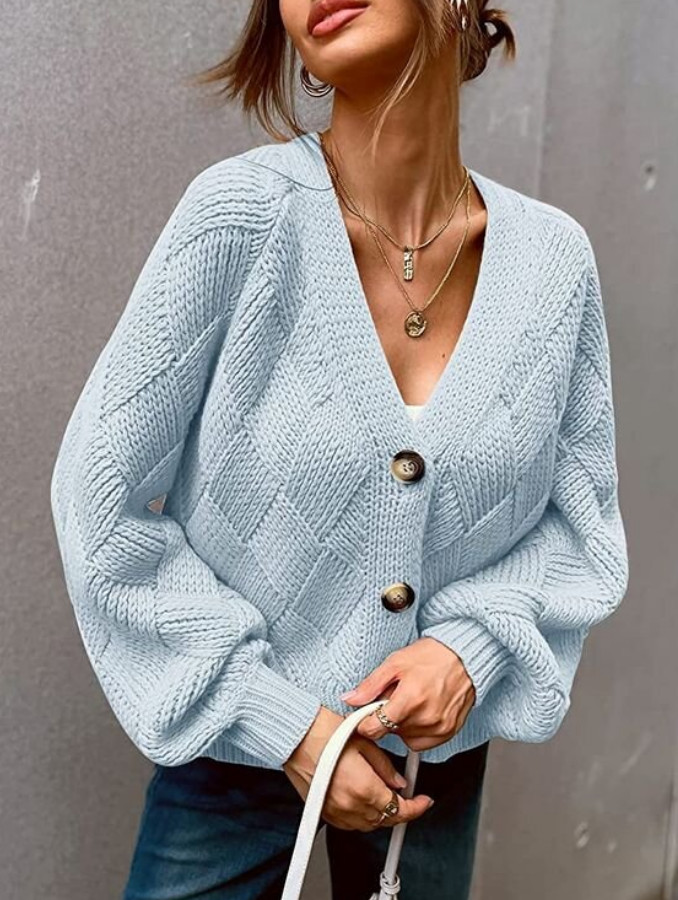
This charming cardigan, with a loose fit, is entirely made with an openwork pattern. The knitting from three strands of kid mohair creates a soft and light fabric, resembling a cloud.
The inspiration for the lace design came from the Japanese knitting book "Japan Knitting Patterns" (author Hitomi Shida). The original pattern taken from this book was modified and adapted for mohair yarn. The cardigan is knitted in a "top-down" direction; there are no seams.
SIZES:
XS (S) M (L) XL
FINAL MEASUREMENTS OF THE CARDIGAN:
- Total length (center back): 50 (54) 57 (60) 63 cm.
- Width at bust circumference: 103 (110) 114 (120) 127 cm.
NEEDLES:
- Circular needles 6mm, 80-100cm long.
- Circular needles 4, 5mm, 80-100cm long.
- Double-pointed needles 4, 5mm (if you are knitting with a small number of stitches in the round using the Magic Loop method, you will not need double-pointed needles).
- Crochet hook 3-3.5mm.
GAUGE:
15 stitches x 20 rows = 10cm on 6mm needles using the overall lace pattern.
YARN:
250 (275) 300 (325) 350 grams of Knitting for Olive Soft Silk Mohair (70%-kid mohair, 30%-silk; 225m per 25 grams), color - ’Sky’. (The knitting is done with 3 strands of kid mohair; the amount of yarn mentioned corresponds to the total amount needed for this cardigan).
REQUIRED:
Buttons with a diameter of 2.4cm - 4 pieces
SIZE SELECTION RECOMMENDATIONS:
The ease allowance is approximately +20cm to the actual (body) measurements of the bust circumference. This allowance is already included in the cardigan's cut. All Final measurements (see page 1) were taken after full blocking of the cardigan (washing + drying flat).
Sizes XS (S) M (L) XL correspond to European sizes 34-36 (36-38) 38-40 (42) 42-44" (= 85 (90) 95 (100) 110 cm - actual bust circumference).
Measure the circumference of your bust with a tape measure; based on the result, choose the appropriate size of the cardigan for you.
BEFORE STARTING WORK:
Please, knit a Swatch. Remember that a mismatch in your gauge with the gauge mentioned above may lead to undesirable results: the size of the cardigan may be larger (or smaller) than you planned.
CONSTRUCTIVE FEATURES:
First, the Upper section of the Back is knitted. Then, stitches are picked up along its shoulder seams, and the Upper sections of the Right and Left fronts are worked from these stitches. At the level of the bottom of the armhole, the Upper sections of the Back and both Fronts are joined into a single piece of knitting - into the Front-Back. After finishing the Front-Back, separate pieces are knitted for the Neckline and Front Edges. The sleeves are knitted in the round from the stitches picked up along the edges of the armhole.
EDGE STITCHES:
For ALL rows of knitting (both RS and WS): the first and last stitch of each row should be knitted as knit stitches only.
Edge stitches are included in the final stitch counts.
In the graphic charts, edge stitches are not indicated.
Important! When knitting the Finishing bands, a different type of edge stitches is used. See the section "Finishing band for the edges and neckline."
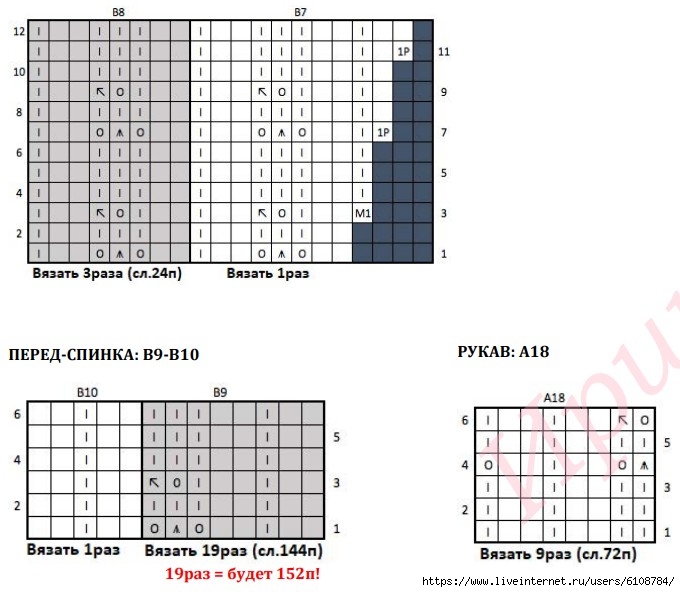
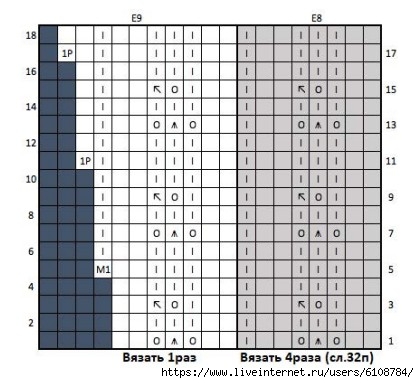
GRAPHIC CHARTS.
All graphic charts are read from bottom to top.
Rows on RS - read from right to left. Rows on WS - read from left to right.
Size XS - knit according to Charts A1-A18.
Size S - knit according to Charts A1-A5, B1-B10, A10-A11, A18
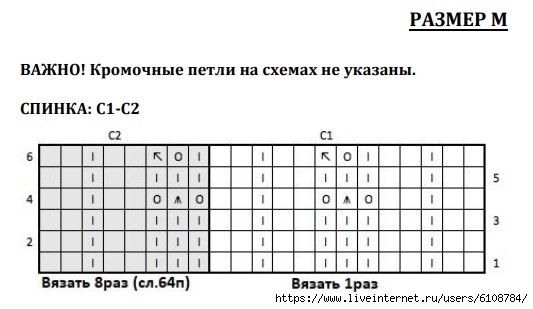
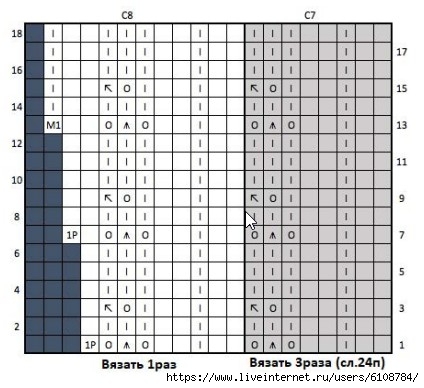
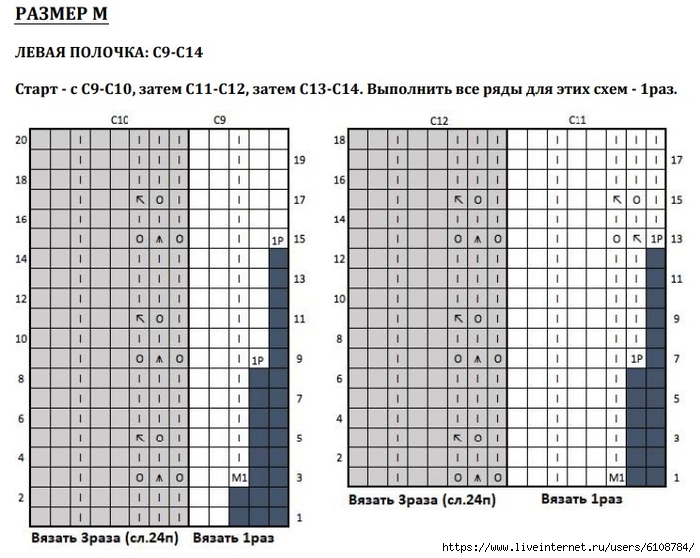
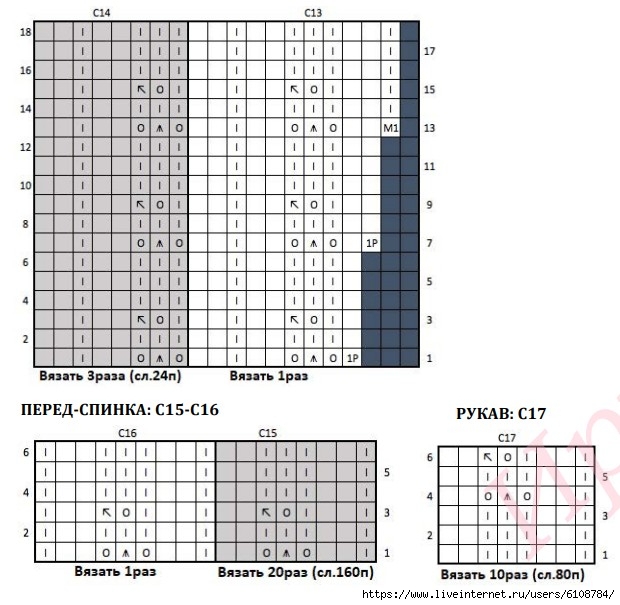
Size M - knit according to Charts C1-C17.
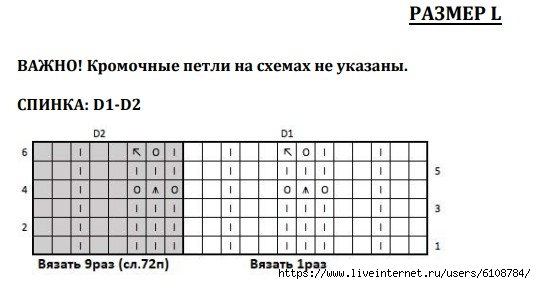
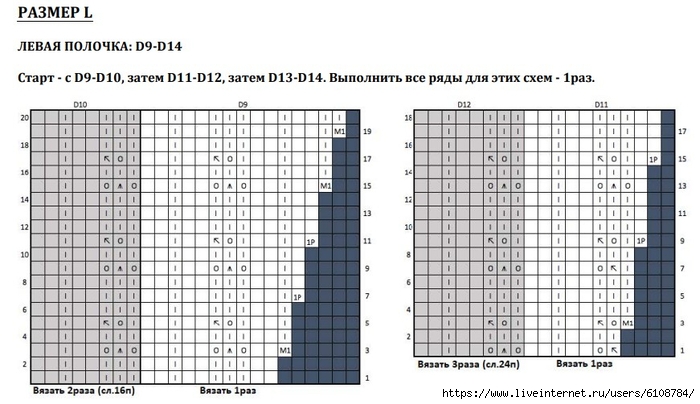
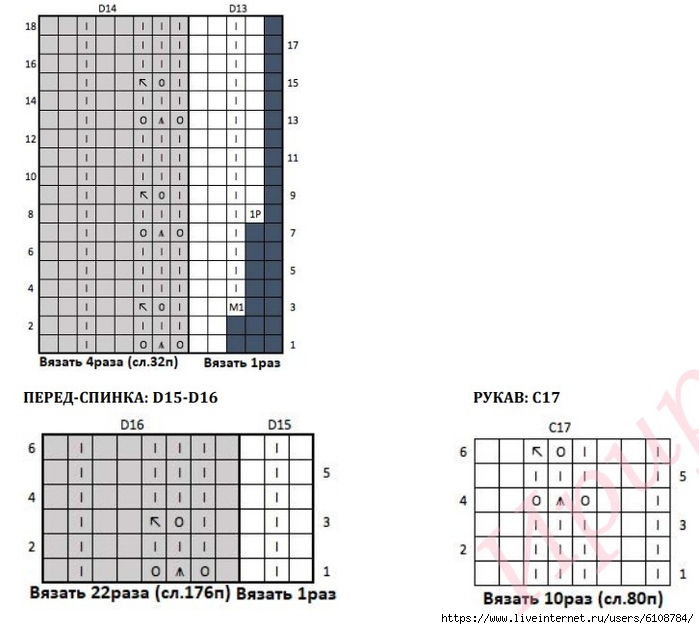
Size L - knit according to Charts D1-D16, C1
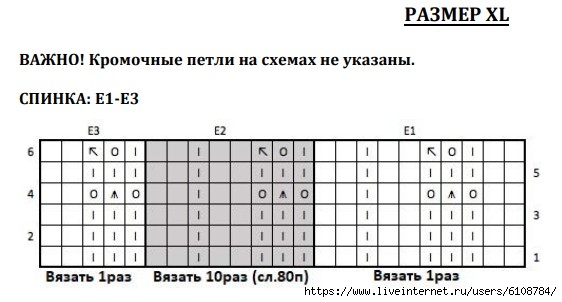
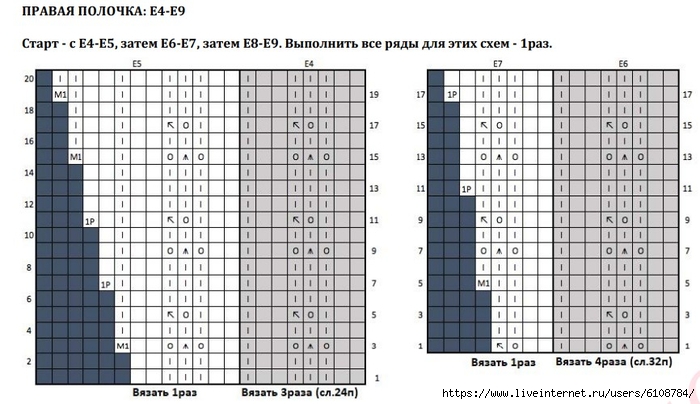
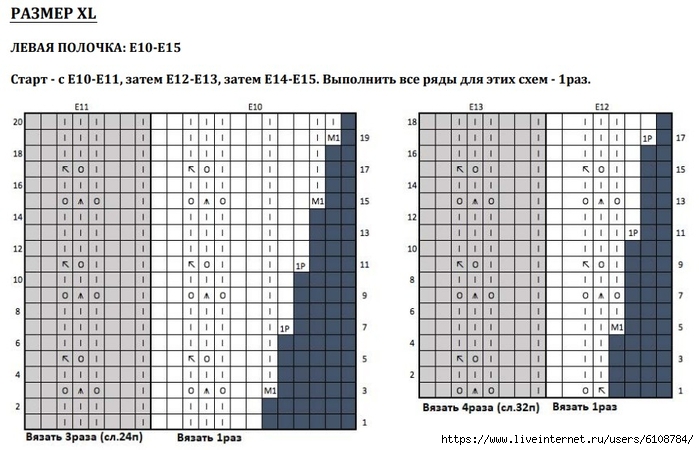
Size XL - knit according to Charts E1-E17, A18
WORK DESCRIPTION:
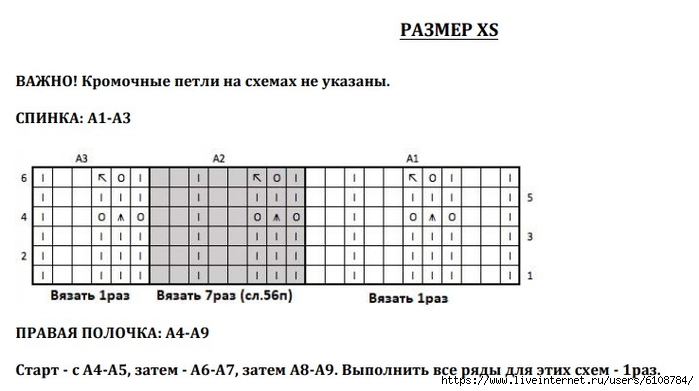
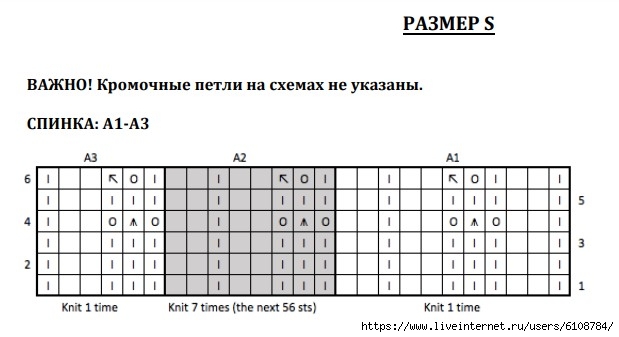
UPPER SECTION OF THE BACK.
With 6mm needles, cast on 75 (75) 79 (87) 97 stitches.
Place two Removable markers along the cast-on edge, which will later help identify the shoulder seam locations of the Back (stitches for the Upper sections of the Fronts will be picked up at the shoulder seams).
Place these Markers as follows:
- the first after 26 (26) 28 (28) 33 stitches.
- the second after 49 (49) 51 (59) 64 stitches.
Now, the stitches are distributed as follows: 26 (26) 28 (28) 33 stitches (=Left shoulder), 23 (23) 23 (31) 31 stitches (=neckline), 26 (26) 28 (28) 33 stitches (=Right shoulder).
Your first row of knitting will be on the WS of the work. This is the setup row.
From here on: 1ed = 1 edge stitch (always 1 knit).
SO -
Row 1 - setup (WS):
XS-S: 1ed, *1purl, 2knit, 3purl, 2knit*; repeat between *-* - until the last 2 stitches, 1purl, 1ed.
M-L: 1ed, *2knit, 1purl, 2knit, 3purl*; repeat between *-* - until the last 6 stitches, 2knit, 1purl, 2knit, 1ed.
XL: 1ed, *2knit, 3purl, 2knit, 1purl*; repeat between *-* - until the last 8 stitches, 2knit, 3purl, 2knit, 1ed.
Next, begin knitting according to the graphic charts.
Start work: Charts A1-A3 (A1-A3) C1-C2 (D1-D2) E1-E3.
The starting row of knitting - is Row 2 (RS) for Charts A1-A3 (A1-A3) C1-C2 (D1-D2) E1-E3.
All subsequent vertical repeats - start with Row 1.
So, knit in the established order according to the specified graphic charts, and perform:
- Rows 2-6 - once,
- then perform - another 7.5 (7.5) 8.5 (8.5) 8.5 vertical repeats of the charts (a vertical repeat for all charts = 6 rows of knitting; these are Rows 1-6).
Or knit in the established order - until the height of the work, measuring from the cast-on edge, reaches 24 (24) 27 (27) 27 cm.
Finish the work with Row 3 (inclusive) - for all graphic charts
Result: you have completed - a total of 8.5 (8.5) 9.5 (9.5) 9.5 vertical repeats according to the graphic charts.
Cut the yarn.
Next, you will pick up stitches along the shoulder seams of the Upper section of the Back; the Upper sections of the Fronts will be worked from these picked-up stitches. The Upper section of the Right Front is worked first.
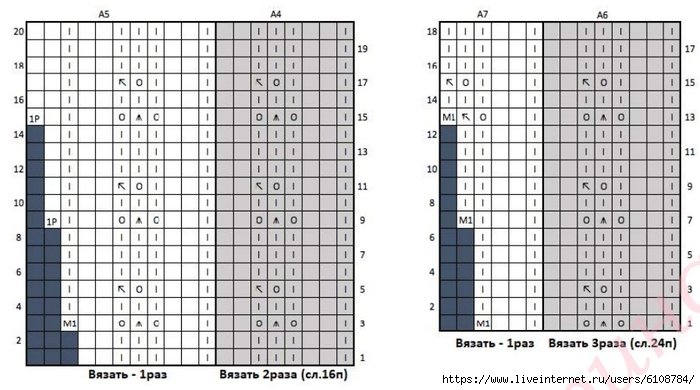
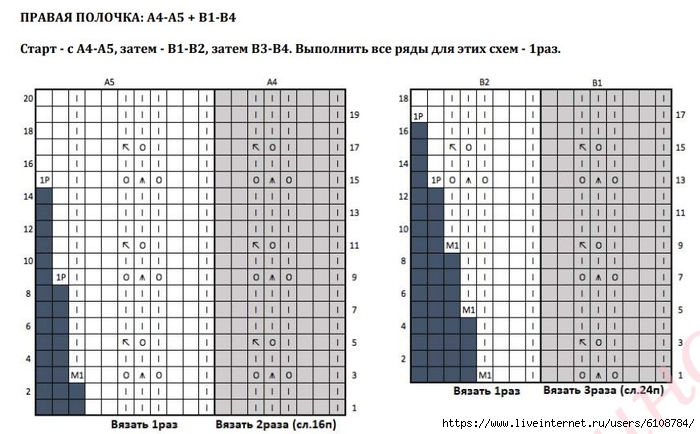
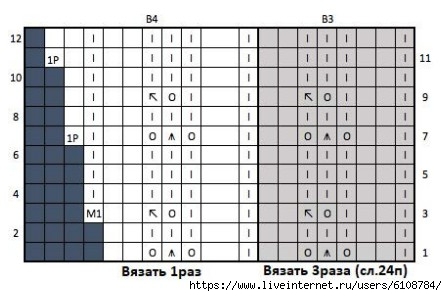
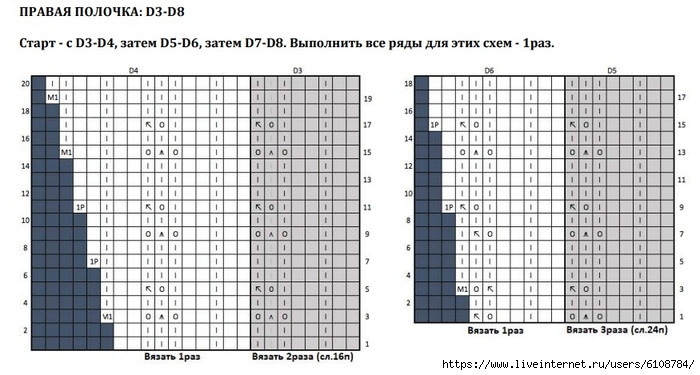
UPPER SECTION OF THE RIGHT FRONT.
From the WS, starting from the side of the armhole, pick up 26 (26) 28 (28) 33 stitches along the right shoulder seam (=cast-on edge) of the Back, and finish at the first Removable marker. Remove the Removable marker.
Your first row of knitting will be on the RS of the work. This is the setup row.
SO -
Row 1 - setup (RS):
XS-S: 1ed, *2knit, 3purl, 2knit, 1purl*; repeat between *-* - until the last stitch, 1ed.
M-L: 1ed, *2knit, 3purl, 2knit, 1purl*; repeat between *-* - until the last 3 stitches, 2knit, 1ed.
XL: 1ed, *2knit, 3purl, 2knit, 1purl*; repeat between *-* - until the last 8 stitches, 2knit, 3purl, 2knit, 1ed.
Next, begin knitting according to the graphic charts.
Do not forget to perform edge stitches; they are not indicated in the graphic charts.
Knit according to charts: A4-A5 (A4-A5) C3-C4 (D3-D4) E4-E5. The starting row of knitting - is Row 1 (RS) - for all graphic charts.
Perform: all rows for the specified charts (=complete 1 full vertical repeat) - once. Then knit according to charts: A6-A7 (B1-B2) C5-C6 (D5-D6) E6-E7.
Starting row of knitting - is Row 1 (RS) - for all graphic charts.
Perform: all rows for the specified charts (=complete 1 full vertical repeat) - once.
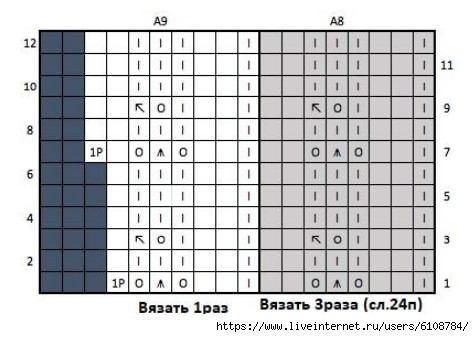
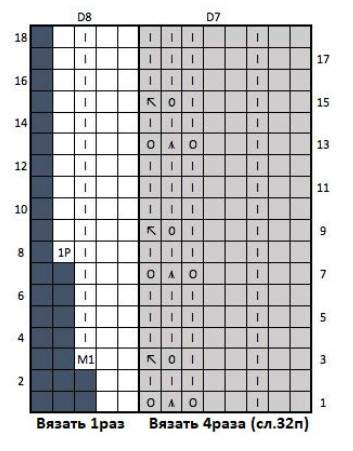
Then knit according to charts: A8-A9 (B3-B4) C7-C8 (D7-D8) E8-E9.
Starting row of knitting - is Row 1 (RS) - for all graphic charts.
Perform: all rows for the specified charts (=complete 1 full vertical repeat) - once.
IMPORTANT! Before cutting the yarn, double-check that the lace pattern ends at the same place, the same for both the Back and the Front.
Cut the yarn.
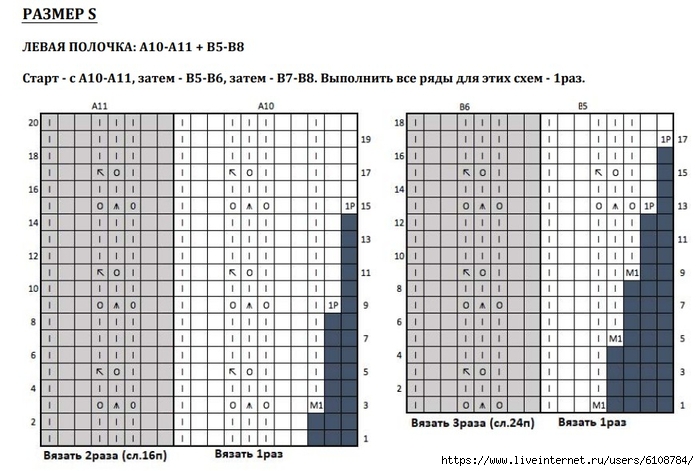
UPPER SECTION OF THE LEFT FRONT
From the WS, starting from the Removable marker (this is the remaining second marker, the first you have already removed), pick up along the left shoulder seam (=cast-on edge) - 26 (26) 28 (28) 33 stitches (finishing at the edge near the armhole).
Remove the Removable marker.
Your first row of knitting will be on the RS of the work. This is the setup row.
SO -
Row 1 - setup (RS):
XS-S: 1ed, *1purl, 2knit, 3purl, 2knit* repeat between *-* - until the last stitch, 1ed.
M-L: 1ed, *2knit, 1purl, 2knit, 3purl* repeat between *-* - until the last 3 stitches, 2knit, 1ed.
XL: 1ed, *2knit, 3purl, 2knit, 1purl* repeat between *-* - until the last 8 stitches, 2knit, 3purl, 2knit, 1ed.
Next, begin knitting according to the graphic charts.
Do not forget to perform edge stitches; they are not indicated in the graphic charts.
Knit according to charts: A10-A11 (A10-A11) C9-C10 (D9-D10) E10-E11.
Starting row of knitting - is Row 1 (RS) - for all graphic charts.
Perform: all rows for the specified charts (=complete 1 full vertical repeat) - once.
Then knit according to charts: A12-A13 (B5-B6) C11-C12 (D11-D12) E12-E13.
Starting row of knitting - is Row 1 (RS) - for all graphic charts.
Perform: all rows for the specified charts (=complete 1 full vertical repeat) - once.
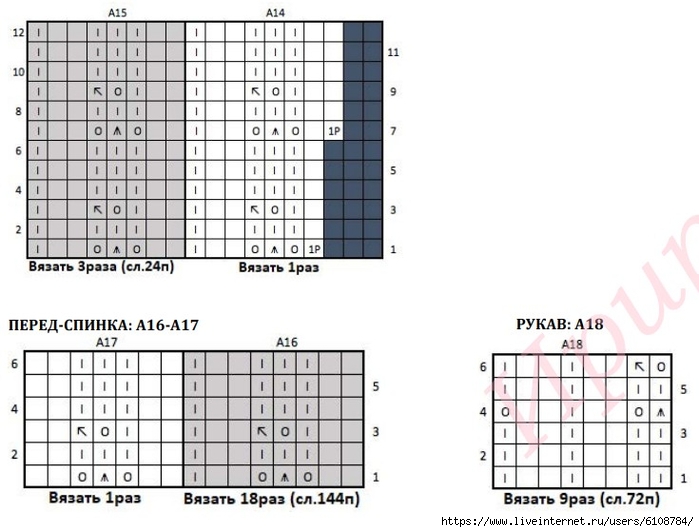
Then knit according to charts: A14-A15 (B7-B8) C13-C14 (D13-D14) E14-E15.
Starting row of knitting - is Row 1 (RS) - for all graphic charts.
Perform: all rows for the specified charts (=complete 1 full vertical repeat) - once.
Next, the Upper sections of the Back and both Fronts will be joined into a single piece - into the Front-Back.
FRONT-BACK.
Knit according to charts: A16-A17 (B9-B10) C15-C16 (D15-D16) E16-E17.
Start work: this is Row 1 (RS) - for all graphic charts.
Next row-joining (RS): knit across the stitches of the Upper section of the Left Front, then pick up 5 (5) 9 (9) 7 stitches (=stitches at the bottom of the Left armhole), then knit across the stitches of the Upper section of the Back, then pick up 5 (5) 9 (9) 7 stitches (=bottom of the Right armhole), then knit across the stitches of the Upper section of the Right Front.
Important! Make sure that the edge stitches along the armholes are included in the lace pattern. All stitches picked up at the lower edges of both armholes, starting from Row 2 - for the charts, should also be included in the overall lace pattern.
IN TOTAL: 153 (159) 171 (181) 191 stitches on the needles.
SO -
Knit according to charts A16-A17 (B9-B10) C15-C16 (D15-D16) E16-E17, and repeat their vertical repeat - TOTAL 7 (9) 9 (10) 11 times.
Or knit in the established order until the height of the Front-Back, measuring from the bottom of the armholes, reaches 21 (27) 27 (30) 33 cm.
Cut the yarn.
Next, you will work on the Band for finishing the edges and neckline. After finishing and attaching the Band to the cardigan fabric, a ribbing will be worked for finishing the lower edge of the Front-Back.
FINISHING BAND FOR THE EDGES AND NECKLINE
This is worked in a 1x1 rib pattern.
First, the Right band piece is worked. Then, stitches are picked up along its cast-on edge, and from these, the Left band piece is worked.
The center of the entire Band is the line where the stitches were picked up for the Left band. When attaching to the cardigan fabric, the center of the Band should align with the center point of the Back neckline. To create a nice outer edge of the Band, you will work the picked-up edge stitches (instead of Garter). The picked-up edge stitches are worked as follows:
In all rows (both RS and WS): the first stitch of the row - "slip 1 stitch as knit with the yarn in front"; the last stitch of the row - "1 knit".
Band for finishing the Right edge and Right side of the neckline:
Needles 4.5mm. Cast on 9 stitches.
Row 1 (WS): 1 knit, *1 knit, 1purl*, repeat between *-* - until the last 2 stitches, 2knit.
Row 2 (RS): 1ed (=slip 1 stitch as knit), (1purl, 1 knit)-repeat until the end of the row
Repeat Rows 1-2 - until the height of the work reaches 54 (60) 63 (67) 70cm.
Finish the work - with Row 2.
Do not cut the yarn.
Band for finishing the Left edge and Left side of the neckline:
Needles 4.5mm. From WS, pick up 9 stitches - along the cast-on edge of the Right Band.
Stitches are picked up as follows: from the yarn ball, measure a short length of yarn, and pick up these stitches from it; while doing this, the yarn leading to the ball is on your right. Then move all the picked-up stitches to the opposite tip of the needles. Thus, the next row of knitting will be on the WS, and you will knit from the yarn leading to the yarn ball.
Row 1 (WS): 1ed (=slip 1 stitch as knit), *1 knit, 1purl*, repeat between *-* - until the last 2 stitches, 2knit.
Row 2 (RS): 1 knit, (1purl, 1 knit)-repeat until the end of the row.
Repeat Rows 1-2 - until the total height of the entire Band (including the Right side Band piece) reaches 108 (120) 126 (134) 140 cm.
Finish the work with Row 1 (=so that the yarn remains on the side of the edge opposite the edge with the slipped stitches). Cut the yarn.
Attaching the Band to the cardigan fabric:
Fold the Finishing Band and the cardigan - (Band over the edges of the cardigan) right sides together. Ensure that the center of the Band (its center = the row with the picked-up stitches) is positioned exactly at the center of the neckline of the Back, and the edges of the Band with the slipped stitches, after attaching, will become the outer edges of the fronts and neckline. Pin the Band to the cardigan fabric.
Important! The Band will be slightly shorter than the edges of the cardigan. This is normal. When pinning the Band to the cardigan, stretch it slightly so that its length matches the length of the cardigan edges.
Work from the yarn remaining attached to the stitches of the Right band.
Start work - from the bottom of the Right edge.
Insert the crochet hook under the first edge stitch of the Band, then under the first edge stitch of the Front, and pull up a loop of yarn; *then insert the hook under the next edge stitch of the Band and the next edge stitch of the Cardigan, pull up a loop (=on the hook = 2 stitches) and knit it through the loop already on the hook; repeat from * - until the end.
After completion, do NOT cut the yarn
Next, you will work on the ribbing to finish the lower edge of the Front-Back.
Continue working from the same yarn used to attach the Band to the cardigan.
Start work - on the WS of the Band.
Knit across 9 stitches of the Band (WS): 1 knit, (1purl, 1 knit)-repeat until the end of these 9 stitches. Turn the work.
Result - you are at the beginning of the Left Front, the next row - is the row on the RS;
Next row (RS): 1ed (=slip 1 stitch as knit), for the next 7 stitches knit: knit over knit stitches, purl over purl stitches, then 2purl together (=1 stitch from the Band + 1 stitch from the Front), then repeat (1 knit, 1 purl) - until the last 10 stitches of the row, then 2purl together (=1 stitch from the cardigan + 1 stitch from the Front), then (knit over knit stitches, purl over purl stitches)-repeat until the last stitch, 1 knit.
For the next 5 (5) 5 (6) 6 cm of knitting: in the established order of the pattern, knit ribbing 1x1 (=1 knit, 1 purl) with the Picked-up edge stitches.
(From the translator: the change of needle size is not indicated. Most likely, continue knitting on 6mm needles)
Finish on the WS of the work.
With a knitting needle, bind off all stitches using the Tubular bind-off method.
SLEEVES (both the same).
The sleeves are knitted in the round. Needles 6mm.
From the WS, evenly pick up stitches along the entire edge of the armhole:
- 5 (5) 9 (9) 7 stitches - pick up along the cast-on edge of the armhole, and mark the beginning of the round approximately at the center of these stitches,
- 33 (33) 35 (35) 36 stitches - pick up upwards, to the shoulder "seam",
- 1 stitch - pick up in the shoulder "seam",
- 33 (33) 35 (35) 36 stitches - pick up downwards, to the starting point of the picked-up stitches.
IN TOTAL: 72 (72) 80 (80) 80 stitches on the needles.
The first stitch immediately after the marker - is the first stitch of the pattern for the graphic chart.
Next, knit according to the graphic charts: A18 (A18) C17 (C17) A18.
Repeat the vertical repeat of the chart - a total of 11 (12) 12 (13) 13 times (or knit until the height of the Sleeve, measuring from the armhole, reaches 38 (41) 41 (44) 44cm).
Change needles. Needles 4.5mm (circular or double-pointed, at your choice).
Next round:
XS-S: start work - before the marker at the beginning of the round stands 1 stitch; *3purl together, 2purl together, 1 knit, 2purl together*; repeat between *-* - until the end of the round.
M-XL: *1 knit, 2purl together, 3purl together, 2purl together*; repeat between *-* - until the end of the round.
Next round: knit ribbing 1x1 (=1 knit, 1 purl), and simultaneously, evenly decrease 4 (2) 6 (4) 2 stitches along the round (decrease stitches as 2purl together).
IN TOTAL: 32 (34) 34 (36) 38 stitches on the needles.
Continue working in a 1x1 rib pattern until the height of the cuff ribbing reaches 5 (5) 5 (6) 6 cm.
With a knitting needle, bind off all stitches using the Tubular bind-off method (=Tubular bind-off method).
LOOPS FOR BUTTONS.
You need to make a total of 4 loops for buttons; the loops will be located along the Right edge of the cardigan.
Along the finishing Band of the Right Front, evenly distribute 4 places for future Loops (mark the places for Loops with Removable markers). The lower Loop should be centered at the height of the ribbing finishing the lower edge. In width, the place for each Loop is the 5th column of stitches (knit stitches) in the 1x1 rib pattern; do not count the edge stitch (=the Band is made in a 1x1 rib).
Before you start forming the Loops, double-check the accuracy of their placement.
The Loops are formed by "stretching" the stitch highlighted by the Removable marker, to a hole through which your button can pass; this hole is then sewn around with yarn (using 2 strands of yarn). Remember that subsequently, from frequent buttoning, your Loops may stretch slightly; please, when sewing the Loops, keep this in mind.
FINISHING WORK.
Sew on the buttons. Weave in all remaining "tails" of yarn.
Block the cardigan. From the translator: there are no pattern charts.
Abbreviations:
RS/WS – right side/wrong side
marker – marker
PM – place marker (or transfer it)
L-needle/R-needle = Left needle/Right needle
2purl together – knit 2 stitches together as purl
2purl together left – alternately slip 2 stitches from the left needle to the right as knit; transfer the stitches back to the left needle in their new position; knit these stitches 2purl together through their back loops.
3purl together - knit 3 stitches together as purl
3purl together center (=double central decrease) – slip 2 stitches simultaneously from the Left needle to the Right needle as if you were going to knit 2purl together; then 1 knit - from the Left needle, and pull the resulting stitch through the slipped stitches.
2knit together – knit 2 stitches together as knit
2knit together left – alternately slip 2 stitches from the left needle to the right as knit; transfer the stitches back to the left needle in their new position; knit these stitches 2knit together through their back loops
3knit together - knit 3 stitches together as knit
+1knit – increase 1 knit stitch from the twisted yarn over: with the left needle, in the direction of the RS, lift the yarn over between stitches onto the left needle and knit it as knit through the back loop (+1 stitch)
+1purl – increase 1 purl stitch from the twisted yarn over: with the left needle, in the direction of the RS, lift the yarn over between stitches onto the left needle and purl it as purl through the back loop (+1 stitch)
GRAPHIC CHARTS.
All graphic charts are read from bottom to top.
Rows on RS - read from right to left.
Rows on WS - read from left to right.
In this lace pattern, all yarn overs and all decreases are performed only on the WS of the work.
The rounding of the neckline is formed by increasing stitches. All these increases are also performed only on the WS of the work.
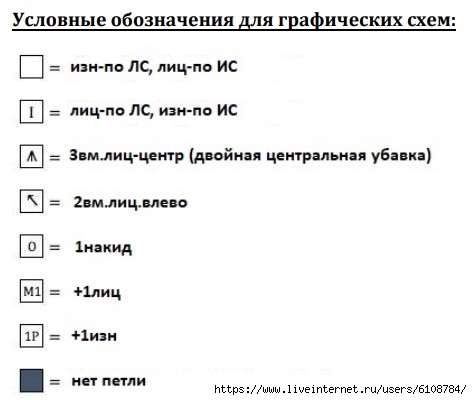
![]() knit
knit
![]() knit
knit
![]() 3 to 1 (double decrease), centered (skpo)
3 to 1 (double decrease), centered (skpo)
![]() 2 together knitwise
2 together knitwise
![]() yarn over
yarn over
M1- + 1 knit.
1P - + 1 purl.
![]() no stitch
no stitch
For each size - there are its own graphic charts.
Please, before starting work on the charts, double-check the correctness of the graphic charts you have chosen (check whether the charts correspond to the size you have chosen)