


Knitted cardigan
Added: 19.09.2025 в 19:29 Views: 7232
Knitted cardiganKlubokhttp://klubok.work/1/2/9132/Klubokhttps://klubok.work/css/image/top-logo-en.png
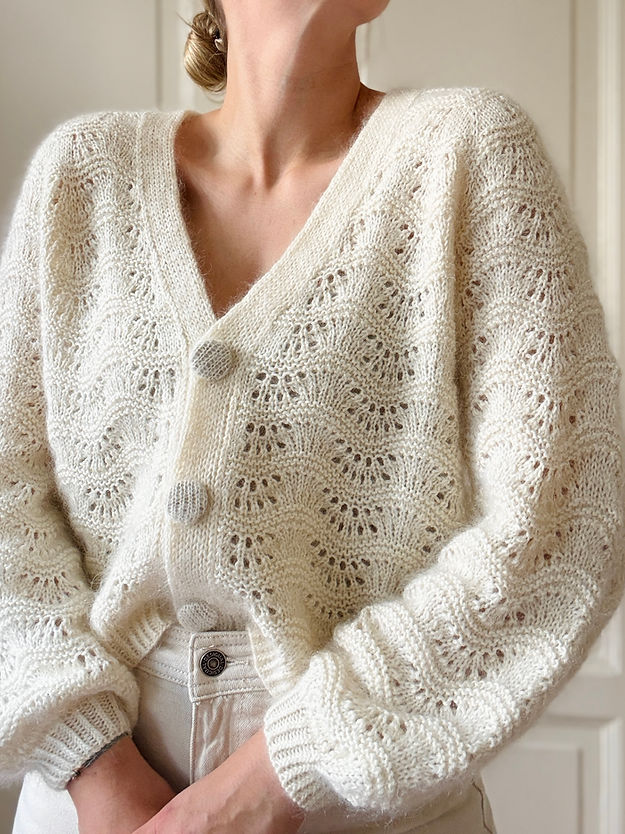
A classic raglan cardigan with a trendy wavy lace pattern.
The cardigan is knitted in a classic raglan style from top to bottom in one piece. First, the yoke is knitted in short rows with a wavy lace pattern, with increases at the raglan seams and additional increases to shape the V-neck.
Once the sleeves are separated from the body and all increases for the V-neck have been made, the cardigan finishes with one piece in a wavy lace pattern without increases. At the end, a bottom band in crossed ribbing 1x1 is knitted.
Then the stitches of the sleeves are returned to work, which are knitted in the round in a wavy lace pattern until the desired length is reached. Shortly before the cuff, a row of decreases is made to give the sleeve a puffy "balloon" shape. The cuffs are then knitted in crossed ribbing 1x1.
In conclusion, stitches are picked up along the edges and neckline of the cardigan, and a button band is knitted using double knitting (tubular knitting).
Buttons are sewn on opposite the buttonholes.
The fit of the cardigan is considered neutral or slightly loose, providing a comfortable fit due to the ease of 2 to 12 cm. The length is relatively short for a cropped cardigan. The most interesting feature is the wavy lace pattern made up of stripes of garter stitch alternating with stripes of lace pattern, creating a unique wavy design.
SIZES XS/S, M/L (XL/2XL, 3XL/4XL)
Chest circumference of the cardigan: 93, 108 (124, 138) cm with ease from 2 to 12 cm.
Length of the finished cardigan: 49.5, 55 (60.5, 66) cm, including a 4 cm lower band.
The length can be adapted to individual measurements, but you may need more yarn.
Sleeve length: about 38 cm from the underarm + 4 cm cuff). The length can be adapted to individual measurements, but you may need more yarn.
YARN
Fine Merino from Majo Garn (100% merino wool, 175 m/50 g): 350, 400 (450, 500) g
and
Pearl Mohair from Majo Garn (70% mohair, 30% silk, 210 m/25 g): 150, 175 (175, 200) g.
NEEDLES
4 mm circular needles and 3.5 mm (optional double-pointed/short needles for knitting the sleeves)
ADDITIONAL
3 - 4 buttons with a diameter of 20 mm, tapestry needle, stitch markers, or yarn scraps.
GAUGE
10 x 10 cm = 22 sts x 34 rows in the "Lace Waves" pattern, using 2 strands of yarn held together, with 4 mm needles (after wet blocking).
Note: The "Lace Waves" pattern requires a lot of yarn, and the cardigan will "grow" after washing and blocking!
ABBREVIATIONS AND TECHNIQUES
RS: right side
WS: wrong side
PM: place marker
SM: slip marker
Raglan st: raglan stitch (the stitch at the raglan line).
R1R (right-leaning increase): using the left needle, lift the yarn between 2 sts from back to front and knit it through the front loop.
R1L (left-leaning increase): using the left needle, lift the yarn between 2 sts from front to back and knit it through the back loop.
Pass over: slip 1 st as knit, knit 1, and pass the slipped stitch over it.
NOTES
Edge stitches (the first and last stitch of the row) are knitted as knit stitches on both RS and WS. Edge stitches are included in the total number of stitches and are also shown in the charts.
The cardigan is knitted with 2 strands (1 strand of Fine Merino + 1 strand of Pearl Mohair, or equivalent yarn with the same gauge).
Lace wavy pattern: follow the charts for your size.
Raglan increases: the yoke of the cardigan is shaped by raglan increases. For each raglan line (a total of 4), there is a middle raglan stitch marked with stitch markers. Before and after this middle raglan stitch, you will need to increase 1 st in each row on the RS (knit R1R before the raglan stitch/knit R1L after the raglan stitch). Note: 4 raglan stitches are not shown in the charts, but they are always knitted in pattern (knit stitch for lace pattern stripes and garter stitch for garter stitch stripes).
!!! Please read the entire description carefully before starting to knit, as you will need to work with several knitting charts and written instructions simultaneously!!!
WORK DESCRIPTION
BODY
The body of the cardigan is knitted from top to bottom in one piece with raglan increases. The V-neck of the cardigan is also shaped by increases on the fronts to create the neckline. These additional increases are made after the first and before the last stitch in every third row on the RS. On the following pages, you will find knitting charts for the back and fronts, as well as for the sleeves, divided by sizes. There are additional written instructions to help make the process as clear as possible.
One section of the wavy lace pattern consists of stripes of lace pattern (in pink) and stripes of garter stitch (in red), which are knitted as follows:

Rows 1–12 and columns 1–17 are repeated continuously. Only the rows on the RS (or odd rounds) are shown. One column corresponds to 1 st in one row/round). Read the chart from right to left and from bottom to top (i.e., in the direction of knitting). Please pay attention to the chart symbols and how to knit it:

knit 2 together
Garter stitch: when knitting back and forth, knit the stitch as knit on both RS and WS. When knitting in the round: in odd rounds, knit as knit, in even rounds, knit as purl.
Knit stitch: when knitting back and forth, knit as knit on RS and purl on WS, and when knitting in the round, always knit as knit.
CAST ON STITCHES
Cast on 74 sts with 4 mm needles, using 2 strands of yarn held together (1 strand of Fine Merino + 1 strand of Pearl Mohair), and using your preferred method of casting on (= Row 1 of the chart). The first row after casting on = WS (Row 2). Here, purl all sts and place PM before and after each raglan stitch (RS) as follows: 1 st (left front), 1 st (RS), 17 sts (left sleeve), 1 st (RS), 34 sts (back), 1 st (RS), 17 sts (right sleeve), 1 st (RS), 1 st (right front) = a total of 74 sts.
Starting from the next row on the RS, begin to make raglan increases in every row on the RS before and after each RS (= Row 3 of the chart).
Therefore, follow the knitting charts for the fronts, sleeves, and back for your size. Start with the left front, then knit the left sleeve, back, right sleeve, and finish with the right front. Knitting charts for all sizes can be found below.
Starting from Row 7, the V-neck is shaped as follows:
FORMING THE V-NECK FOR SIZES XS/S AND M/L:
Row 7 (RS): 1 knit, R1L (forming the V-neck), knit all sts in the "Lace Waves" pattern with raglan increases according to the chart, until the last 1 st, R1R (forming the V-neck), 1 knit.
(= a total of 10 increases).
Row 8 (WS): knit all sts in the "Lace Waves" pattern.
Rows 9 - 12: knit according to the chart for your size in the "Lace Waves" pattern with raglan increases, but without additional increases for the V-neck.
Repeat these 6 rows a total of 9 times. Finish after the WS.
Additional increases for the V-neck will now be made in every 2nd row on the RS (i.e., you will need to repeat rows 7 - 10).
Repeat these 4 rows a total of 3 times (IMPORTANT: for size XS/S you will need to separate the sleeves already!).
Then make additional increases for the V-neck 2 more times in EVERY RS ROW.
Note for all sizes (except XS/S) raglan increases for the sleeves stop in rows - 67 (77, 77) and beyond. This means you will then need to make increases only for the fronts and back raglan (a total of 4 raglan increases in each odd row).
For detailed information on additional increases for the V-neck, see the charts for your size.
The V-neck increases are highlighted.
FORMING THE V-NECK FOR SIZES XL/2XL AND 3XL/4XL:
Row 7 (RS): 1 knit, R1L (forming the V-neck), knit all sts in the "Lace Waves" pattern with raglan increases according to the chart, until the last 1 st, R1R (forming the V-neck), 1 knit.
(= a total of 10 increases).
Row 8 (WS): knit all sts in the "Lace Waves" pattern.
Rows 9 – 12: knit according to the chart for your size in the "Lace Waves" pattern with raglan increase, but without additional increases for the V-neck.
Repeat these 6 rows a total of -, - (14, 16) times.
Finish after the WS. In the next row on the RS, the sleeves are separated from the body, but additional increases for the V-neck must continue for -, - (3, 1) more times after separating the sleeves.
Note: for all sizes (except XS/S) raglan increases for the sleeves stop in row -, 67 (77, 77) and beyond. This means you will then need to make increases only for the fronts and back raglan (a total of 4 raglan increases in each odd row).
For detailed information on additional increases for the V-neck, see the knitting charts for your size.
The V-neck increases are highlighted.
FINISHING THE YOKE
Follow the knitting charts to finish the yoke. Remember to make raglan increases before and after each RS in each row on the RS, and also to make additional increases to form the V-neck in every 2nd row. Follow the charts for your size until you reach the blue line (= a total of 352, 382 (430, 458) sts). Finish after the WS. The following number of stitches should be on the needles:
Size XS/S: 44 sts (left front), 1 st (raglan), 81 sts (left sleeve), 1 st (raglan), 98 sts (back), 1 st (raglan), 81 sts (right sleeve), 1 st (raglan), 44 sts (right front) = a total of 352 sts.
Size M/L: 53 sts (left front), 1 st (raglan), 81 sts (left sleeve), 1 st (raglan), 110 sts (back), 1 st (raglan), 81 sts (right sleeve), 1 st (raglan), 53 sts (right front) = a total of 382 sts.
Size XL/2XL: 59 sts (left front), 1 st (raglan), 93 sts (left sleeve), 1 st (raglan), 122 sts (back), 1 st (raglan), 93 sts (right sleeve), 1 st (raglan), 59 sts (right front) = a total of 430 sts.
Size 3XL/4XL: 67 sts (left front), 1 st (raglan), 93 sts (left sleeve), 1 st (raglan), 134 sts (back), 1 st (raglan), 93 sts (right sleeve), 1 st (raglan), 67 sts (right front) = a total of 458 sts.
Now the stitches of the sleeves are set aside and new stitches are cast on for each underarm.
SEPARATING THE SLEEVES
In the next row on the RS, knit in the "Lace Waves" pattern, DO NOT make raglan increases and separate the sleeves as follows:
knit the stitches of the left front and RS, place the sleeve stitches on a holder, cast on 2, 7 (12, 17) new sts for the underarm, knit RS and knit the back stitches in the "Lace Waves" pattern, knit RS, place the sleeve stitches on another holder and cast on 2, 7 (12, 17) new sts for the underarm, knit RS and knit the stitches of the right front in the "Lace Waves" pattern (= 194, 234 (268, 308) sts).
FINISHING THE BODY
New stitches cast on under each underarm are introduced into the "Lace Waves" pattern as follows:
For better orientation and recognition when knitting the wavy lace pattern, I recommend placing a marker right in the middle between two pattern repeats under the underarm (between 3 yarn overs or between 3 knit together/3 passes).
To track the pattern, it may be helpful to place a marker between each pattern repeat to keep track of when one pattern repeat ends and when the next one begins.

Now knit all stitches in the "Lace Waves" pattern according to the charts. If necessary for your size, make additional increases for the V-neck (= a total of 200, 234 (274, 310) sts).
Then knit the body without increases until it reaches a height of about 26, 28 (30, 32) cm from the underarm, or to the desired length. Otherwise, you will need more yarn than stated. Finish after the lace section of the "Lace Waves" pattern (the lace stripe of the pattern).
Note the "Lace Waves" pattern on the fronts: the pattern repeats do not always turn out complete, meaning the "Lace Waves" pattern may be partially executed along the edges of the fronts. Therefore, carefully follow the charts and knit according to the charts for your size!
BOTTOM BAND
Switch to 3.5 mm needles and knit the next 12 rows (about 4 cm) in crossed ribbing 1x1, (*1 knit crossed, 1 purl crossed*, repeat from * to *).
Bind off all stitches in row 13 using a stretchy method
SLEEVES
The sleeves are also made in the "Lace Waves" pattern. Return the set-aside sleeve stitches to work and pick up 4, 9 (9, 15) sts along the cast-on stitches of the underarm, using 4 mm needles, with 2 strands held together. Place a marker in the middle of the picked-up underarm stitches to indicate the beginning of the round and for orientation for the wavy lace pattern, as described for the body section. You should have a total of 85, 90 (102, 108) sts.
The new stitches picked up at the underarm are included in the "Lace Waves" pattern as follows (note that the "Lace Waves" pattern does not have a full repeat for all sizes and you will need to pick up a different number of stitches than the cast-on stitches of the body underarm):

KNITTING THE SLEEVES
The sleeves are now knitted in the "Lace Waves" pattern in the round until their length reaches 38 cm (or to the desired length - note that the cuffs will add about 4 cm to the final sleeve length). Finish with the lace section of the "Lace Waves" pattern (the lace stripe of the pattern).
Switch to 3.5 mm needles and in the next row, knit all sts as knit.
Then make the following decreases: *knit 2 together*, repeat from * to * until the last 1, 0 (0, 0) sts (= 43, 45 (51, 54 sts).
Then knit 4 cm in crossed ribbing 1x1.
Note for all sizes with an odd number of stitches: in the first round of the ribbing, knit the first 2 stitches together as knit through the back loops (crossed), to achieve an even number of stitches.
After knitting the cuff, bind off all stitches using a stretchy method and knit the second sleeve similarly.
DOUBLE BUTTON BAND
Note: the "Lace Waves" pattern stretches significantly after washing and blocking! This may lead to gauge issues when knitting the double button band. Therefore, some test knitters preferred to wash and block their cardigans BEFORE knitting the double band to avoid gauge issues. I knitted my band without washing and blocking the cardigan, and it turned out great.
Pick up stitches along the edges of the fronts and neckline of the cardigan, using 3.5 mm needles and two strands held together. I recommend picking up 1 st from 1 st and 2 sts from 3 rows. If you have a looser gauge, I recommend picking up 1 st from every 2 rows. If you have a tighter gauge, I recommend picking up 1 st from 1st row. Additionally, you can adjust the needle size to address gauge issues.
The total number of stitches depends on your individual gauge. Start picking up stitches from the bottom edge of the right front and continue to the bottom edge of the left front.
HOW TO KNIT THE DOUBLE BAND
Cut the yarn and start from the bottom edge of the right front. Cast on 14 sts on 3.5 mm needles, taking 2 strands together. Then transfer these new stitches to the left-hand needle and knit the button band as follows:
RS: starting with the new 14 sts, slip 1 st as knit, *1 knit, slip 1 st as purl with the yarn in front of the work*, repeat from * to *, until the last 1 st. The last stitch is knitted as knit through the back loop together with the first picked-up stitch of the front. Then turn the work and knit in the opposite direction (i.e., in rows) as follows:
WS: slip 1 st as purl, *1 knit, slip 1 st as purl with the yarn in front of the work*, repeat from * to *, until the last 1 st, 1 purl.
Repeat these 2 rows until you knit the band to a height of about 4 cm. Starting from the next row, make the first buttonhole as follows:
BUTTONHOLE
Knit the first 7 sts in double knitting, as described above. Then turn the work and knit in the opposite direction in double knitting.
Continue to knit these first 7 sts in double knitting until you knit about 1.5 cm. Cut the yarn and reattach it to knit from the 8th st.
Knit the last 7 sts in double knitting, as described above, until this part reaches a height of 1.5 cm. Cut the yarn.
Continue to knit all 14 sts in double knitting, as described above, until you reach the next buttonhole (at a distance of about 7 cm).
Repeat the above until you complete a total of 3–4 buttonholes.
Then continue to knit double knitting along the entire neckline and fronts, without making any more buttonholes. Once you reach the bottom edge of the left front, bind off all stitches and sew buttons on the left band opposite the buttonholes.
If you want to "knit" your own buttons to match the fabric of your cardigan
CHARTS
Charts for the fronts, back, and sleeves.
There are separate knitting charts for EACH SIZE.
Please note the following notes:
Follow the chart up to the blue line corresponding to your size. One cell is one stitch in one row. Only the rows on the RS are shown. Raglan increases are made in every row on the RS. The knitting charts include raglan increases and edge stitches, as well as new stitches formed for the V-neck.
Read the chart from right to left and from bottom to top (direction of knitting).
The raglan stitches are NOT SHOWN, but you will need to knit them between each chart (a total of 4 raglan stitches).
Additionally, the raglan stitches are knitted according to the pattern, "Lace Waves". This means that when knitting the lace stripe of the pattern, they should be knitted in stockinette stitch. And when knitting the garter stitch stripe, they should be knitted in garter stitch.


Also in this category:


admin@klubok.work