[8 sts increased; 27 sts for each front side, 31 sts for each sleeve, 60 sts for the back.]
[8 sts increased; 28 sts for each front side, 33 sts for each sleeve, 62 sts for the back.]
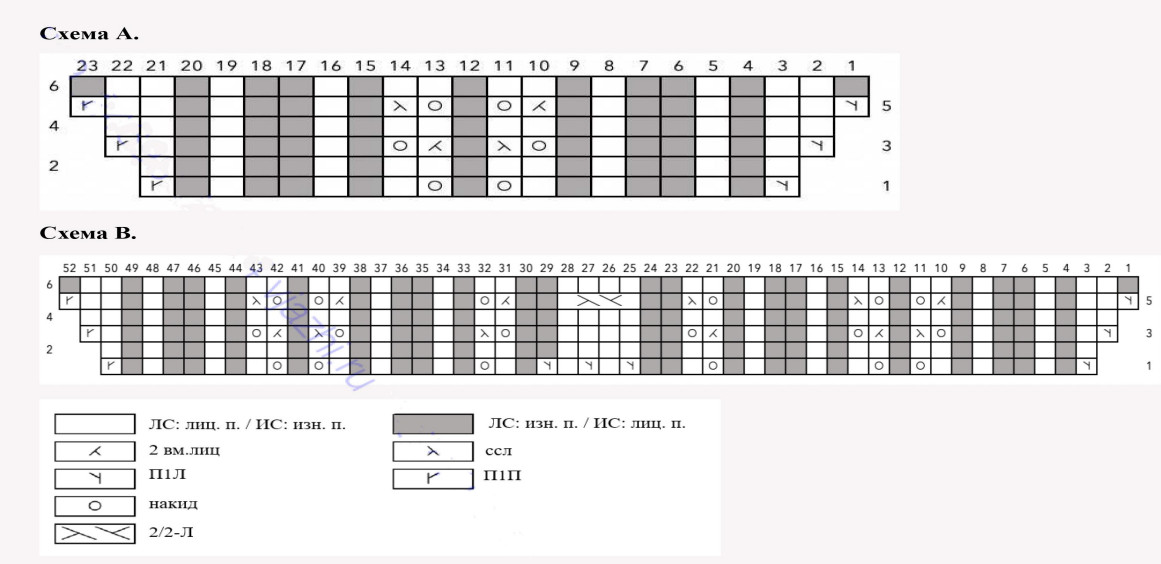
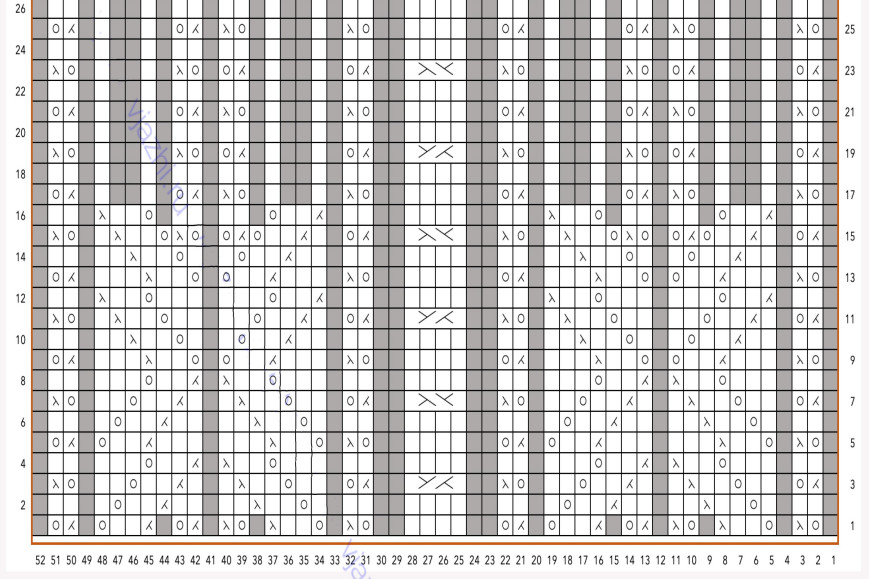
Row 9 (increases, RS): knit the placket as established, cm, knit the corresponding row of Chart A1, cm, knit broken rib to M, PCP, cm
-
knit Raglan-A/RS, as established, cm,
PCP, knit broken rib to M, cm, knit the corresponding row of Chart A1, cm, knit Raglan-B/RS, as established, cm*,
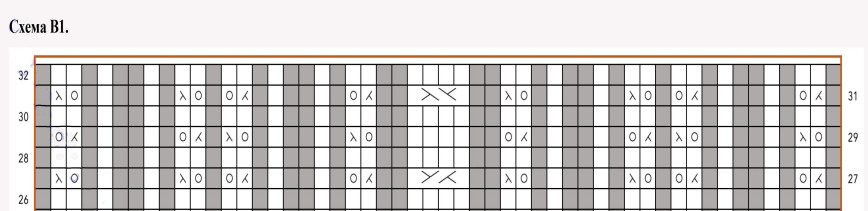
PCP, knit broken rib to M, cm, knit the corresponding row of Chart B1, cm, knit broken rib to M, PCP, cm,
repeat from * to *,
PCP, knit broken rib to M, cm, knit the corresponding row of Chart A1, cm, knit the placket, as established.
[8 sts increased; 29 sts for each side of the front, 35 sts for each sleeve, 64 sts for the back]
Row 10 (no increases, WS): knit the placket as established, cm, knit the corresponding row of Chart A1, cm, purl stitches to M, cm,
-
knit Raglan/WS, as established, cm,
purl stitches to M, cm, knit the corresponding row of Chart A1, cm, purl stitches to M, cm,
knit Raglan-B/WS, as established, cm*,
purl stitches to M, cm, knit the corresponding row of Chart B1, cm, purl stitches to M, cm, knit Raglan/WS, as established, cm,
purl stitches to M, cm, knit the corresponding row of Chart A1, cm, purl stitches to end of row, knit the placket, as established.
Repeat Rows 9 and 10 two more times (8, 14, 16, 17, 21) for a total of 3 (9, 15, 17, 18, 22) times, increasing new stitches into the broken rib pattern and into the raglan charts at the established pace! The last knitted row should be Row 10 (WS).
[16 (48, 80, 112)(136, 158, 176)(197, 213, 237)(43, 40, 43)(46, 50) sts for each front side, 68 (80, ...) sts for each sleeve, ...]
Sizes (S, M, L, XL, XXL):
INCREASES SECTION 2. For sizes - (-, -, L)(XL, 2XL, 3XL)(4XL, 5XL).
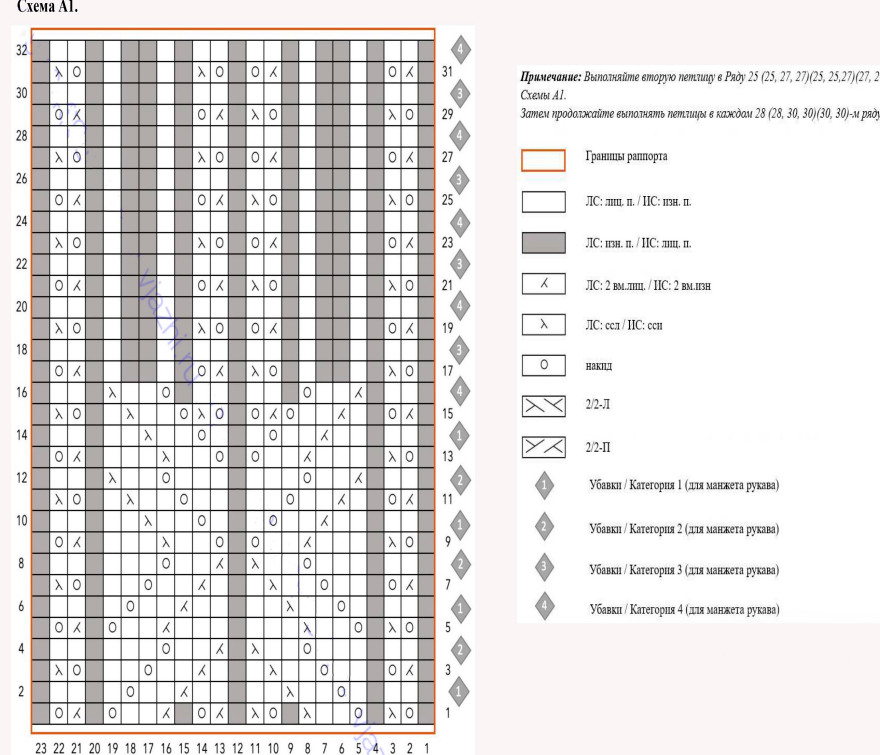
Note: continue to follow Charts A1 and B1, from Row - (-, -, 5)(9, 3, 9)(15, 23).
Rows 1–2: repeat Rows 9–10 from INCREASES SECTION 1.
[8 sts increased; for - (-, -, 42)(44, 44, 47)(47, 51) sts for each side of the front,
for - (-, -, 61)(65, 59, 65)(71, 79) sts for each sleeve, - (-, -, 90)(94, 88, 94)(100, 108) sts for the back]
Row 3 (increases only for back/front, RS): knit the placket as established, cm, knit the corresponding row of Chart A1, cm,
knit broken rib to M, PCP, cm, * knit Raglan-A/RS, as established, cm,
knit broken rib to M, cm, knit the corresponding row of Chart A1, cm, knit broken rib to M, cm, knit Raglan-B/RS, as established, cm*,
PCP, knit broken rib to M, cm, knit the corresponding row of Chart B1, cm, knit broken rib to M, PCP, cm,
repeat from * to *,
PCP, knit broken rib to M, cm, knit the corresponding row of Chart A1, cm, knit the placket, as established.
[4 sts increased; for - (-, -, 43)(45, 42, 45)(48, 52) sts for each side of the front,
for - (-, -, 61)(65, 59, 65)(71, 79) sts for each sleeve, - (-, -, 92)(96, 90, 96)(102, 110) sts for the back]
Row 4 (no increases, WS): knit as established in WS rows.
Repeat Rows 1–4 another - (-, -, -)(-, 3, 3)(3, 4) times.
The last knitted row will be Row 4 (WS).
[- (-, -, -)(-, 51, 56, 59)(62, 66) sts for each front side,
-
(-, -, -)(-, 67, 71, 73, 79)(85, 93) sts for each sleeve, - (-, -, -)(-, 104)(108, 118, 128)(140, 138) sts for the back]
Sizes (S, M, L)(XL, 2XL, 3XL)(4XL, 5XL): Move on to INCREASES SECTION 3.
Sizes (-, -, -, 3XL)(4XL, 5XL): Move on to SLEEVE SEPARATION SECTION.
INCREASES SECTION 3. For sizes XS (S, M, L)(XL, 2XL, -)(-, -).
Knit this section, continuing to follow Charts A1 and B1, from Row 17 (29, 9, 21)(25, 3, -)(-, -) of the charts.
Row 1 (increases, RS): knit the placket as established, cm, knit the corresponding row of Chart A1, cm,
knit broken rib to M, PCP, cm,
-
knit Raglan-A/RS, as established, cm,
PCP, knit broken rib to M, cm, knit the corresponding row of Chart A1, cm, knit broken rib to M, PCP, cm,
knit Raglan-B/RS, as established, cm,
PCP, knit broken rib to M, cm, knit the corresponding row of Chart B1, cm, knit broken rib to M, PCP, cm,
repeat from * to *,
PCP, knit broken rib to M, cm, knit the corresponding row of Chart A1, cm, knit the placket, as established.
[8 sts increased; by 32 (38, 44, 50)(52, 57, -)(-, -) sts for each side of the front,
by 41 (53, 65, 69)(73, 75, -)(-, -) sts for each sleeve, 70 (82, 94, 106)(110, 120, -)(-, -) sts for the back]
Row 2 (no increases, WS): knit the row as established.
Row 3 (no increases, RS): knit the row as established, cm, knit the corresponding row of Chart A1, cm, knit broken rib to M, PCP, cm,
-
knit Raglan-A/RS, as established, cm,
knit broken rib to M, cm, knit the corresponding row of Chart A1, cm, knit broken rib to M, PCP, cm,
knit Raglan-B/RS, as established, cm,
knit broken rib to M, cm, knit the corresponding row of Chart B1, cm, knit broken rib to M, PCP, cm,
repeat from * to *,
PCP, knit broken rib to M, cm, knit the corresponding row of Chart A1, cm, knit the placket, as established.
Row 4 (no increases, WS): knit the WS row as established.
Repeat Rows 1–4 one more time (7, 5, 1)(1, 0, -)(-, -) times, sewing in a buttonhole as established.
The final knitted row will be Row 16 (20, 24, 28)(32, 6, -)(-, -) Chart A1 and B1.
[56 (40, 24, 8)(8, -, -)(-, -) sts increased; 39 (43, 47, 51)(53, -, -)(-, -) sts for each side of the front,
55 (63, 71, 71)(75, -, -)(-, -) sts for each sleeve, 84 (92, 100, 108)(112, -, -)(-, -) sts for the back,
4 sts for each raglan, 8 sts for each placket].
304 (336, 368, 384)(400, 416, 432)(456, 488) sts total.
SLEEVE SEPARATION.
Note: continue knitting according to Charts A1 and B1, with Row 17 (21, 25, 29)(1, 7, 9)(15, 23) Chart A1 and B1.
Sleeve separation row (LS): knit the placket as established, cm; knit the corresponding row from Chart A1, cm,
*knit in broken ribbing until the marker, remove the marker, knit the next 2 raglan stitches according to the instructions in Table A (see below).
Slip the next 59 (67, 75, 75)(79, 83, 89, 97) sts with Chart A1 markers onto a stitch holder or waste yarn as follows:
2 raglan sts, remove the marker, 55 (63, 71, 71)(75, 75, 79)(85, 93) sts for the sleeve, remove the marker, 2 raglan sts.
Beadworks Loop Cast On stitches for the back: cast on 7 (7, 7, 7)(11, 11, 15)(17, 17) sts.
Tip: place detachable markers on the first and last cast-on stitch to help you orient where to lift stitches for the sleeves.
Knit the next 2 raglan sts according to Table B, remove the marker, continue knitting in broken ribbing to the next marker, cm*.
Knit the corresponding row from Chart B1, cm; repeat from * to *; knit the corresponding row from Chart A1, cm; knit the placket as established.
Table A
| XS, S, M, L, XL, 2XL |
1 purl, 1 knit |
| XL, 2XL |
1 purl, 1 knit |
| 4XL, 5XL |
1 knit, 1 purl |
Table B
| XS, S, M, L, XL, 2XL |
1 knit, 2 knit |
| XL, 2XL |
1 purl, 1 knit |
| 4XL, 5XL |
1 knit, 1 purl |
200 (216, 232, 248)(264, 280, 296)(312, 328) sts in the body.
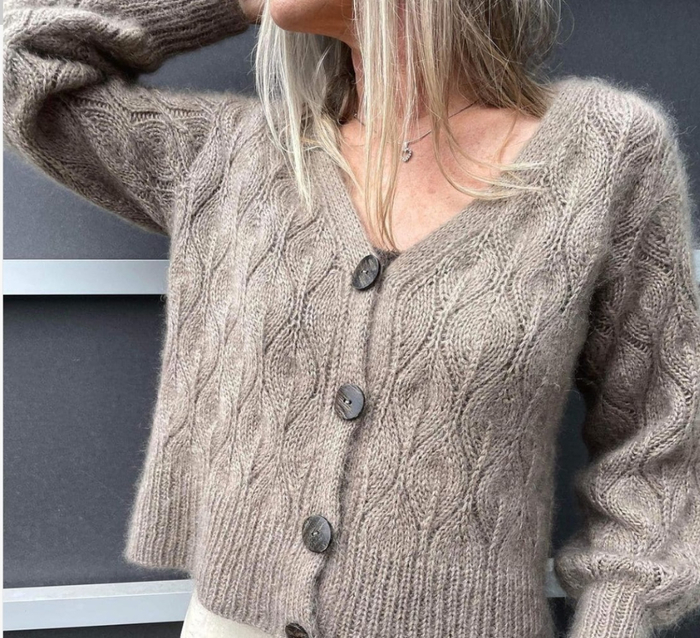
CARDIGAN BODY.
Next Row (RS): knit the placket as established, cm; knit the corresponding row from Chart A1, cm; purl stitches to the marker, cm; knit the corresponding row from Chart B1, cm; purl stitches to the marker, cm; knit the corresponding row from Chart A1, cm; knit the placket as established.
Next Row (LS): knit the placket as established, cm, knit the corresponding row from Chart A1, cm, knit in broken ribbing to the next marker, cm, knit the corresponding row from Chart B1, cm, knit in broken ribbing to the next marker, cm, knit the corresponding row from Chart A1, cm, knit the placket as established.
Continue knitting as established in the previous two rows, making buttonholes in the corresponding rows of the placket.
Knit the body to a length of about 27.5 (26.5, 27.5, 28)(31, 30, 33)(31.5, 30) cm from the underarm edges.
Finish Row 30 (32, 6, 12)(24, 28, 6, 8, 12) of Charts A1 and B1.
Or finish with another even row of the charts, but keep the note below in mind.
Note: The slope of decreases in the stitch columns 2–3 of the charts in the last LS row should match the slope of the stitches at the ends of Rows 29 (31, 5, 11)(23, 27, 5)(7, 11).
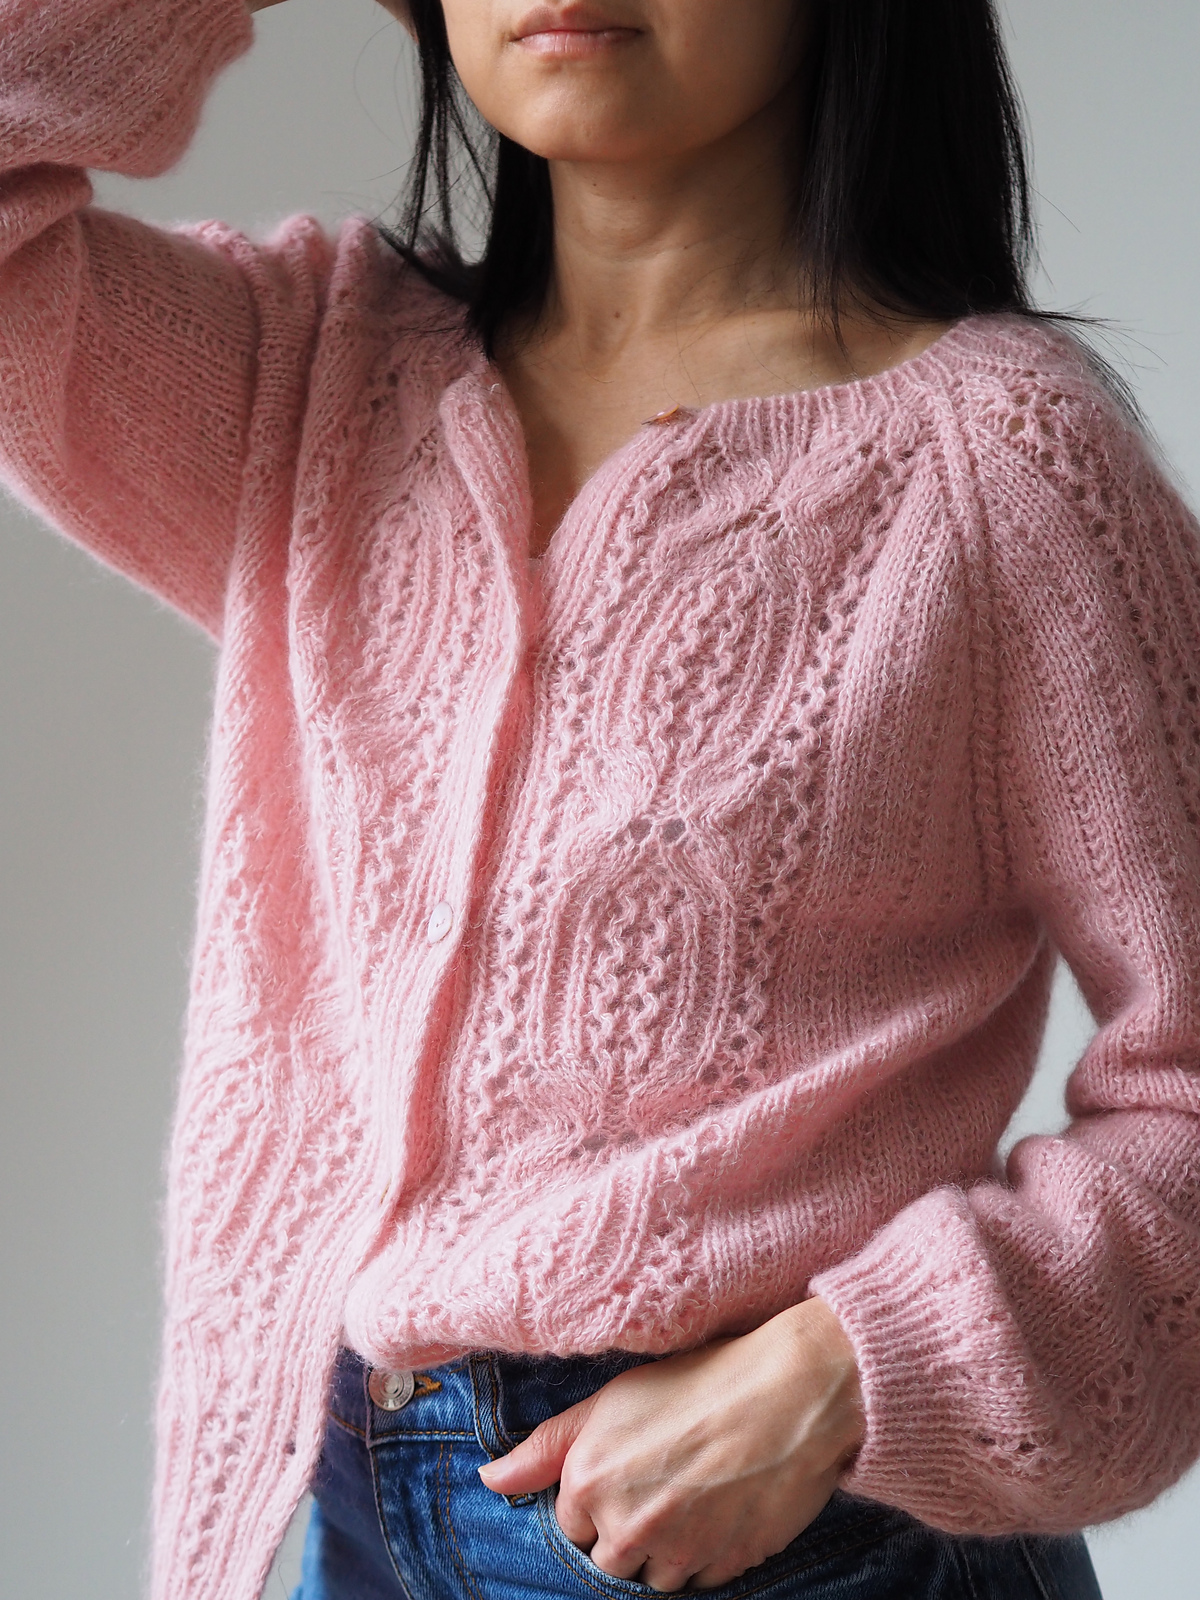
If you would like to adapt the decreases in the columns to your preferences, note that this will change the position of the slanted buttonhole relative to the cardigan in the photo.
LOWER HEM.
Switch needles to 3.5 mm needles.
Only for Sizes XS (S, M, L)(XL, 2XL, 3XL)(-, -):
-
2 increases in knit, 1 purl, (1 knit, 1 purl) × 1, 1 knit, remove marker,
-
2 increases in knit, 1 purl, (1 knit, 1 purl) × 1, 1 knit, remove marker.
-
2 increases in purl, 1 purl, (1 knit, 1 purl) × 8 times, slip, 1 purl, remove marker,
1 knit, (1 purl, 1 knit) – to marker, remove marker,
1 knit, repeat from * to *, 2 increases in purl, (1 knit, 2 increases in purl, 1 knit), 2 increases in purl, remove marker,
1 knit, (1 purl, 1 knit) – to marker, remove marker,
1 purl, repeat from * to *, 1 purl, cm, knit the placket as established.
[11 sts decreased; 189 (-, 221, 237)(-, -, 285)(-, -) sts remain.]
Only for Sizes - (S, -, -)(XL, 2XL, -)(4XL, 5XL):
Decreases Row (LS): knit the placket as established, cm, 1 purl, slip, 1 purl, (1 knit, 1 purl) × 8 times, 2 increases in knit, 1 purl, remove marker,
1 knit, (1 purl, 1 knit) – to marker, remove marker,
1 purl, repeat from * to *, 2 decreases in purl, (1 knit, 2 decreases in purl, 1 knit), 2 decreases in purl, remove marker,
1 knit, (1 purl, 1 knit) – to marker, remove marker,
1 purl, repeat from * to *, 1 purl, cm, knit the placket as established.
[11 sts decreased; - (205, -, -)(253, 269, -)(301, 317) sts remain]
Next for all sizes:
Next Row (RS): knit the placket as established, cm, 1 knit, (1 purl, 1 knit) – to the marker, cm, knit the placket as established.
Next Row (RS): knit the edge band as established, cm, 1 purl, (1 knit, 1 purl) – to the marker, cm, knit the edge band as established.
Repeat the last 2 rows, performing the buttonhole in the rhythm established for your size, until the rib height reaches 15 cm.
End on WS.
Perform 1 preparatory row before tubular bind-off of stitches:
Row 1 (RS): (1 сн-нпр, 1 лиц), (1 сн-нпр, 1 лиц) x 3 times, (1 лиц, 1 сн-нпр) x 3 times, {1 сн-нпр, 1 лиц}.
-
Row 2 (WS): {1 сн-нпр, 1 изн}, (1 лиц, 1 сн-нпр) x 3 times, remove the Marker, 1 knit, (1 сн-нпр, 1 knit) – to the Marker, remove the Marker, (1 сн-нпр, 1 knit) x 3 times, {1 сн-нпр, 1 изн}.
Bind off the stitches from the RS using the tubular method.
SLEEVES.
Both sleeves are worked the same.
Place 59 (67, 75, 75)(79, 79, 83)(89, 97) stitches of the sleeve onto 4 mm needles with markers.
Needle type (long-cable circular needles for the Magic Loop method or short-cable circular needles, or double-pointed needles) choose according to your preference.
Starting from the right underarm corner, pick up 7 (7, 7, 7)(11, 11, 15)(17, 17) stitches from the picked-up underarm stitches, then knit 2 raglan stitches according to Table C, then knit in broken rib until marker, cm, knit Row 17 (21, 25, 29)(1, 7, 9)(15, 23) of Scheme A1, cm, knit in broken rib until 2 raglan stitches remain, knit 2 raglan stitches according to Table D, then slip 2 (2, 2, 2)(-, 2)(3, 3) stitches onto the right needle (not knitted) with the yarn behind the work.
Note: The slipped stitches will allow you to begin the next row following the broken rib pattern /3 knit, 1 purl/ – for all sizes. Move the LM after the last slipped stitches. This will be the start of the circular row.
= 66 (74, 82, 82)(90, 90, 98)(106, 114) stitches of the sleeve.
Table C
| XS, S, M, L, XL |
2 knit |
| XL, 2XL |
1 purl, 1 knit |
| 4XL, 5XL |
1 knit, 1 purl |
Table D
| XS, S, M, L, XL |
1 knit |
| XL, 2XL |
1 purl, 1 knit |
| 4XL, 5XL |
1 knit, 1 purl |
Next Round (RS): knit the corresponding round according to Scheme A1, cm,
1 knit, 1 purl, cm, (1 knit, 1 purl) – to 3 stitches before the LM, 1 knit, 1 purl – to the end of the round.
Continue knitting as established in the previous 2 round/rows until the length of the piece reaches approximately 33 (35, 37, 39, 41, 43, 45) cm from the underarms.
-
Finish Row 18 (24, 32, 6)(10, 16, 14)(20, 24) of Scheme A1 or another even row of Scheme A1.
SLEEVE CUFF.
Switch to 3 mm needles.
Perform Round 1 of Decreases according to the instructions marked with the symbol ◆ with the number corresponding to the last knitted row of Scheme A1 (see notes on Scheme A1).
For example, if you finished the sleeve at Row 18 of Scheme A1, you should perform Round of Decreases 1 according to the instruction numbered 3.
ROUND OF DECREASE 1.
◆ Knit in broken rib to the marker, cm, 1 purl, 2 wrap stitches, 1 purl, (1 knit, 2 wrap purls) x 2 times,
1 knit, 1 purl, 1 knit, (2 wrap purls, 1 knit) x 2 times, 1 purl, wrap, 1 purl, cm, knit in broken rib to the end of the round.
◆ Knit in broken rib to the marker, cm, 1 purl, wrap, 1 purl, (1 knit, 2 wrap purls) x 2 times,
1 knit, 1 purl, 1 knit, (2 wrap purls, 1 knit) x 2 times, 1 purl, wrap, 1 purl, cm, knit in broken rib to the end of the round.
◆ Knit in broken rib to the marker, cm, 1 purl, 2 wrap stitches, 1 purl, 1 knit, 2 wrap purls, 1 knit, 1 purl,
2 wrap stitches, 1 purl, 1 knit, (2 wrap purls, 1 knit), 1 purl, wrap, 1 purl, cm, knit in broken rib to the end of the round.
◆ Knit in broken rib to the marker, cm, 1 purl, 2 wrap stitches, 1 purl, 1 knit, 2 wrap purls, 1 knit, 1 purl,
2 wrap stitches, 1 purl, 1 knit, (2 wrap purls, 1 knit), 1 purl, wrap, 1 purl, cm, knit in broken rib to the end of the round.
[6 stitches decreased; 60 (68, 76, 76)(84, 84, 92)(100, 108) stitches remaining.]
-
ROUND OF DECREASE 2.
Only for Sizes XS (–, M, L)(XL, 2XL, –)(4XL, –):
CCU, 1 purl, 3 knits, 1 purl, CCU, repeat – until 4 stitches before the marker, 1 purl, 3 knits, remove the marker,
1 purl, (1 knit, 1 purl) – to the marker, remove the marker, 3 knits, 1 purl, [ CCU, 1 purl, 3 knits, 1 purl ], repeat [–] until end of round.
[– (12, –, –) (–, 18 –)(22, –) stitches decreased; (56, –, –) (–, 74) (–, 86) stitches remaining.]
Only for Sizes – (S, –, –) ( –, 3XL) ( –, 5XL):
3 knit, 1 purl, CCU, 1 purl, 3 knit, repeat – to the marker, remove the marker, 1 purl, (1 knit, 1 purl) – to the marker,
remove the marker, [ 3 knit, 1 purl, CCU, 1 purl, 3 knit ], repeat [–] to the end of the round.
[– (12, –, –) (–, 18 –)(22, –) p. decreased; (56, –, –) (–, 74) (–, 86) p. remaining.]
Knit the sleeve cuff in 1 x 1 rib (1 knit, 1 purl) to approximately 3 cm in height.
Perform 2 preparatory rounds before tubular bind-off of stitches.
Round 1: 1 knit, 1 slipped-yarn; repeat – to end of round.
Round 2: 1 slipped-st, 1 purl; repeat – to end of round.
Close the sleeve ribbing tubularly.
END OF WORK.
Weave in all ends. Block the cardigan to the final measurements.
Sew the buttons on the left placket (approximately on the 4th stitch of the placket, this will be the knit stitch).